User Guide
1. General Instructions
Login Page

Open your web browser and follow the steps below to access the system login page.
- Enter the specific website address for the information as follows:
https://erp.health.sa/web/login
Enter your login credentials:
- Username (your company email address, all characters have to be small letters)
- Password
- Click on the "Login" button
- Or click direct on HHC Single Sing-on
Main Menu
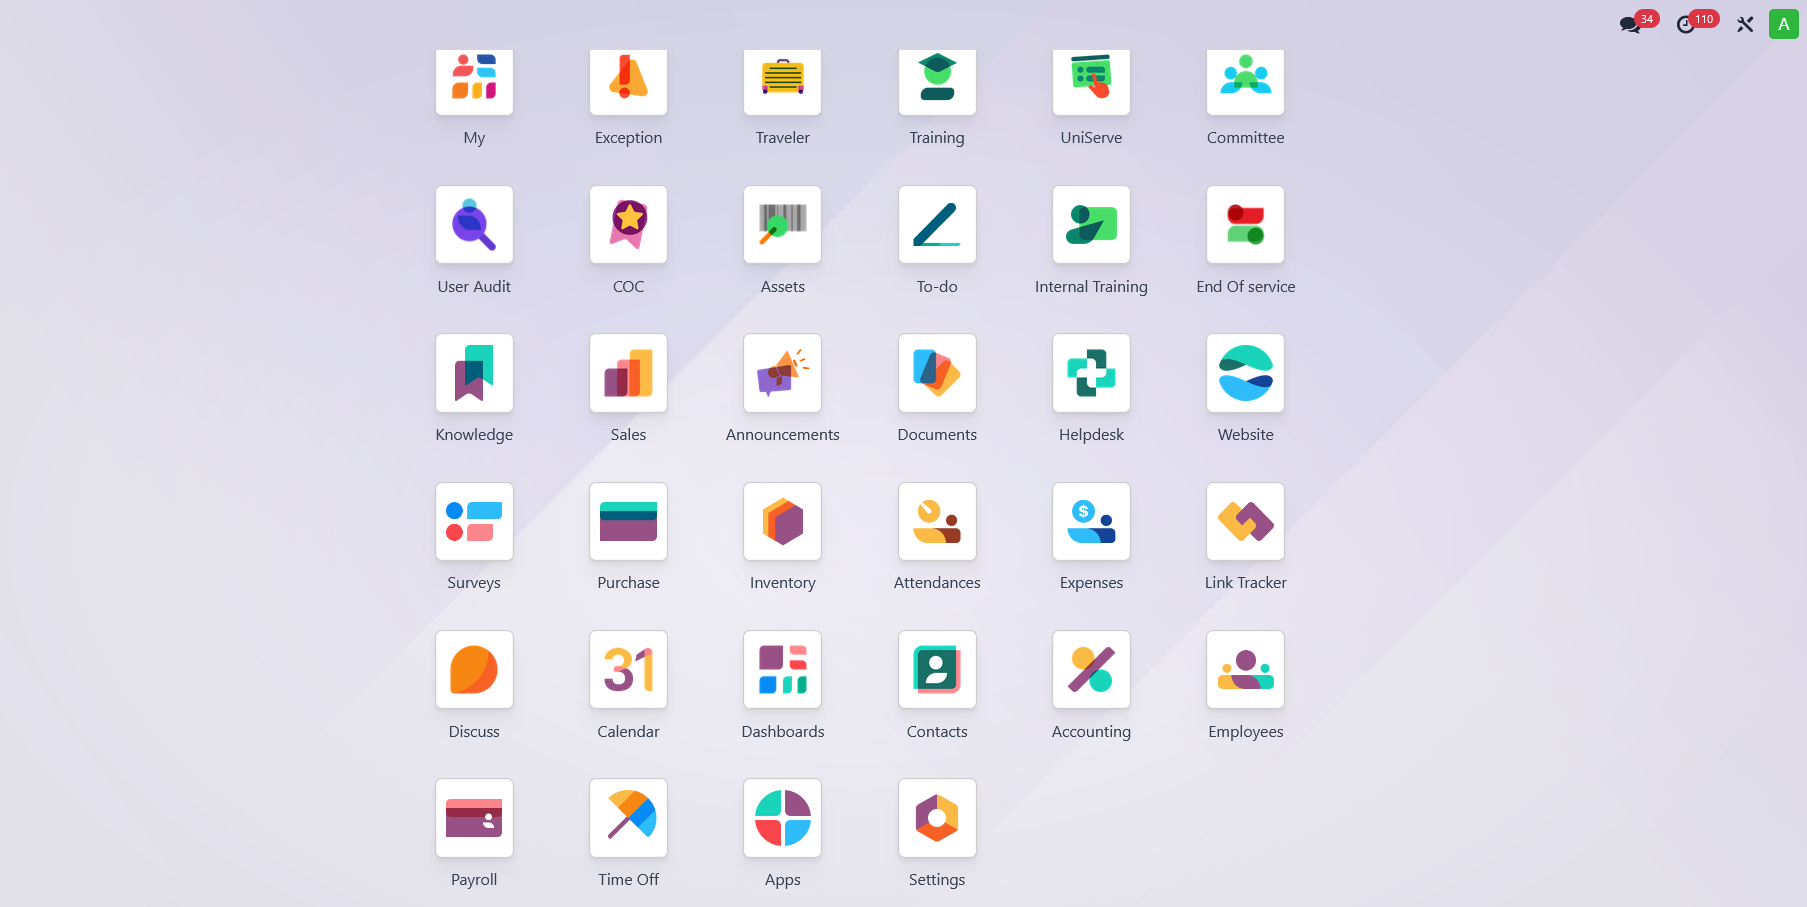
After logging in, users will see the employee self-service features and the icons for the available modules according to their permissions on the main screen. Additionally, users can access more modules that align with their permissions by clicking the icon in the top left corner, as shown in the picture below.

Each user will be able to see the available modules according to their permissions on the main menu screen. Additionally, there is a top-side menu that changes direction based on the language and contains shortcut icons for chats, notifications, activities, and user profile settings.
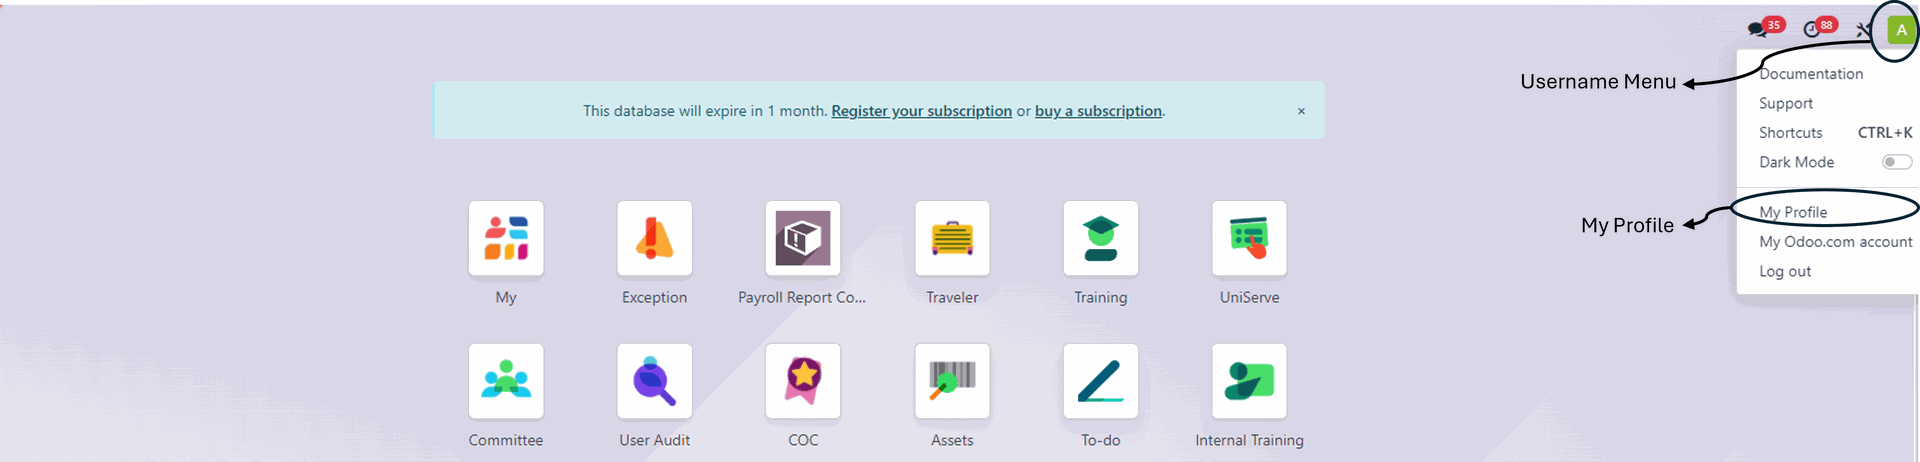
My Profile Settings
The system enforces default settings for each new user, including language and notification preferences in documents. In the following steps, we will explain how to change the language and password through the user profile settings, accompanied by illustrative images.
- Click on the username at the top of the screen as shown in the previous image.
- After the appearance of the side menu as shown in the previous image, select "My Profile" from the menu.
- Choose the desired language from the drop-down menu.
- Enter the signature in the "digital signature"filed as shown in the following illustrative image.
- After finishing, you can click on the word "Save" on your profile screen.

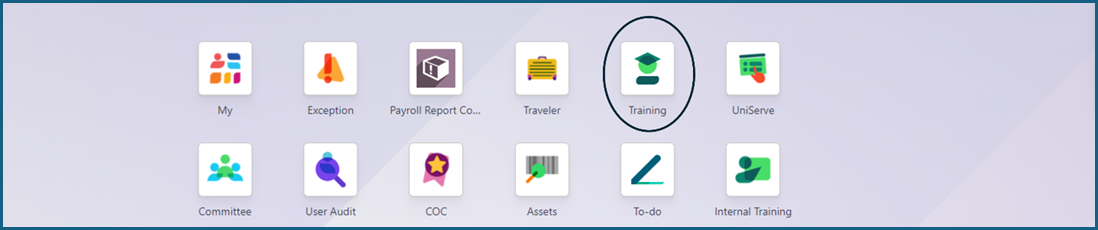
2. Training
To access the module, click on the training icon on the main
Training Request
The following screen will appear by clicking on the training module, displaying the training request menu. On the top of the screen, you will see the search tools, and on the top left, the New button so allow the employee to create a new expenses request

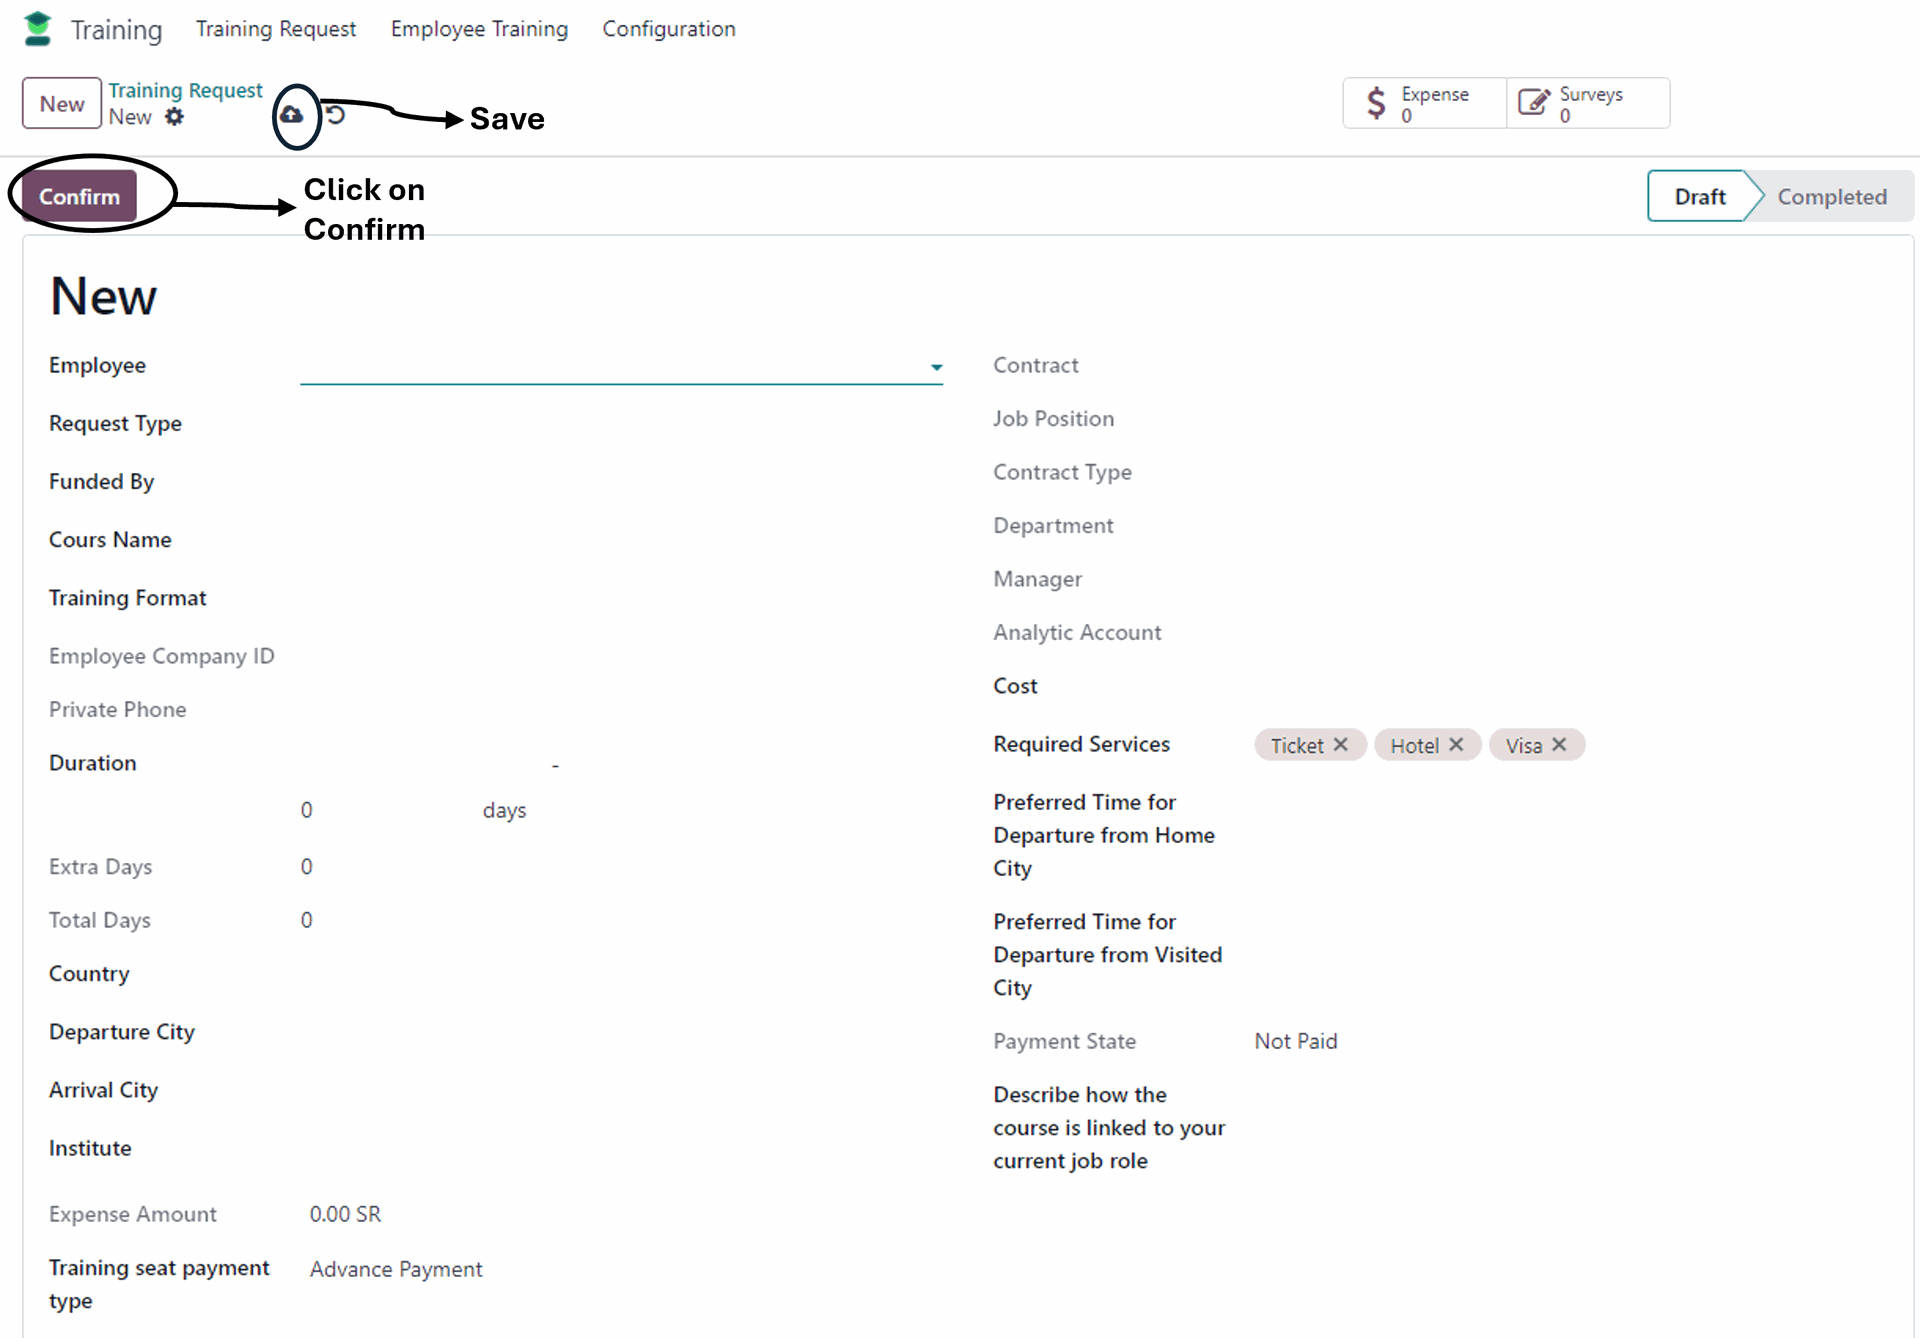
Upon clicking the New button, the following screen will be displayed:
Here, the employee will fill in the essential fields for the training and save it by clicking the save button
When clicking on save the allowances will be calculated based on the employee's choices. Then, click the confirm button if all the information is accurate. The request will go through several approvals
Employee Training
View the employee training list by clicking on "Employee Training" in the main menu. The list of information about all trainees who have completed their training period will be shown. As in the picture below
Each employee record includes a brief description of their training, the name of the course, and the attached request with the start and end dates of the training period. Each employee can view their own records as well as the records of employees beneath them

3. Expense
To access the module, click on the training icon on the main menu screen, as illustrated in the image below

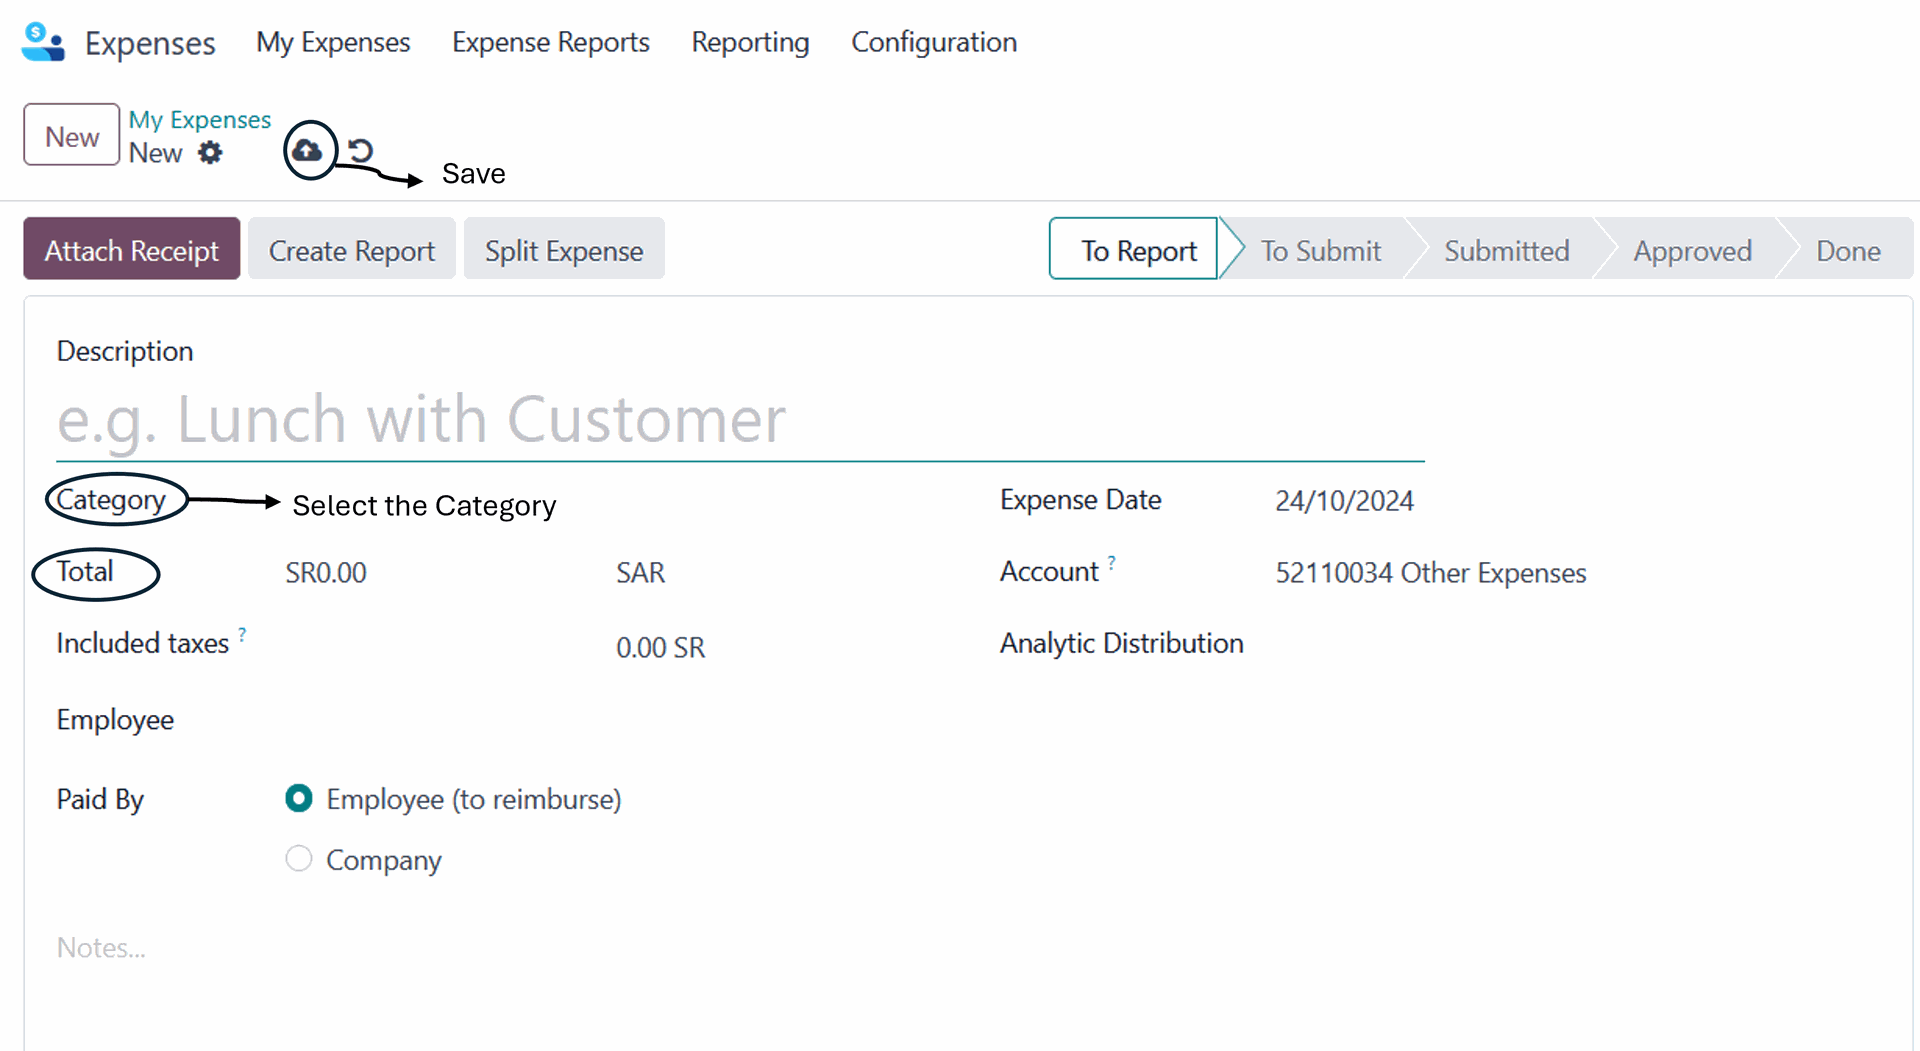
The page below will appear. You can return to the module list page by clicking on the top left icon highlighted in the red box or you can create an Expenses request by clicking on "New"

Then fills in all their required fields, including description, category, and total amount, and selects whether the expenses were paid by the employee or the company. After that, they click on "Save." After saving the expense request you can attach a receipt then create report
Back to the main page of the module by clicking on My Expenses and select the expenses you want to then click on the “Create Report” button to submit for approval.

Regarding to Create Report button, you can select one expense or multi expenses that status into Report
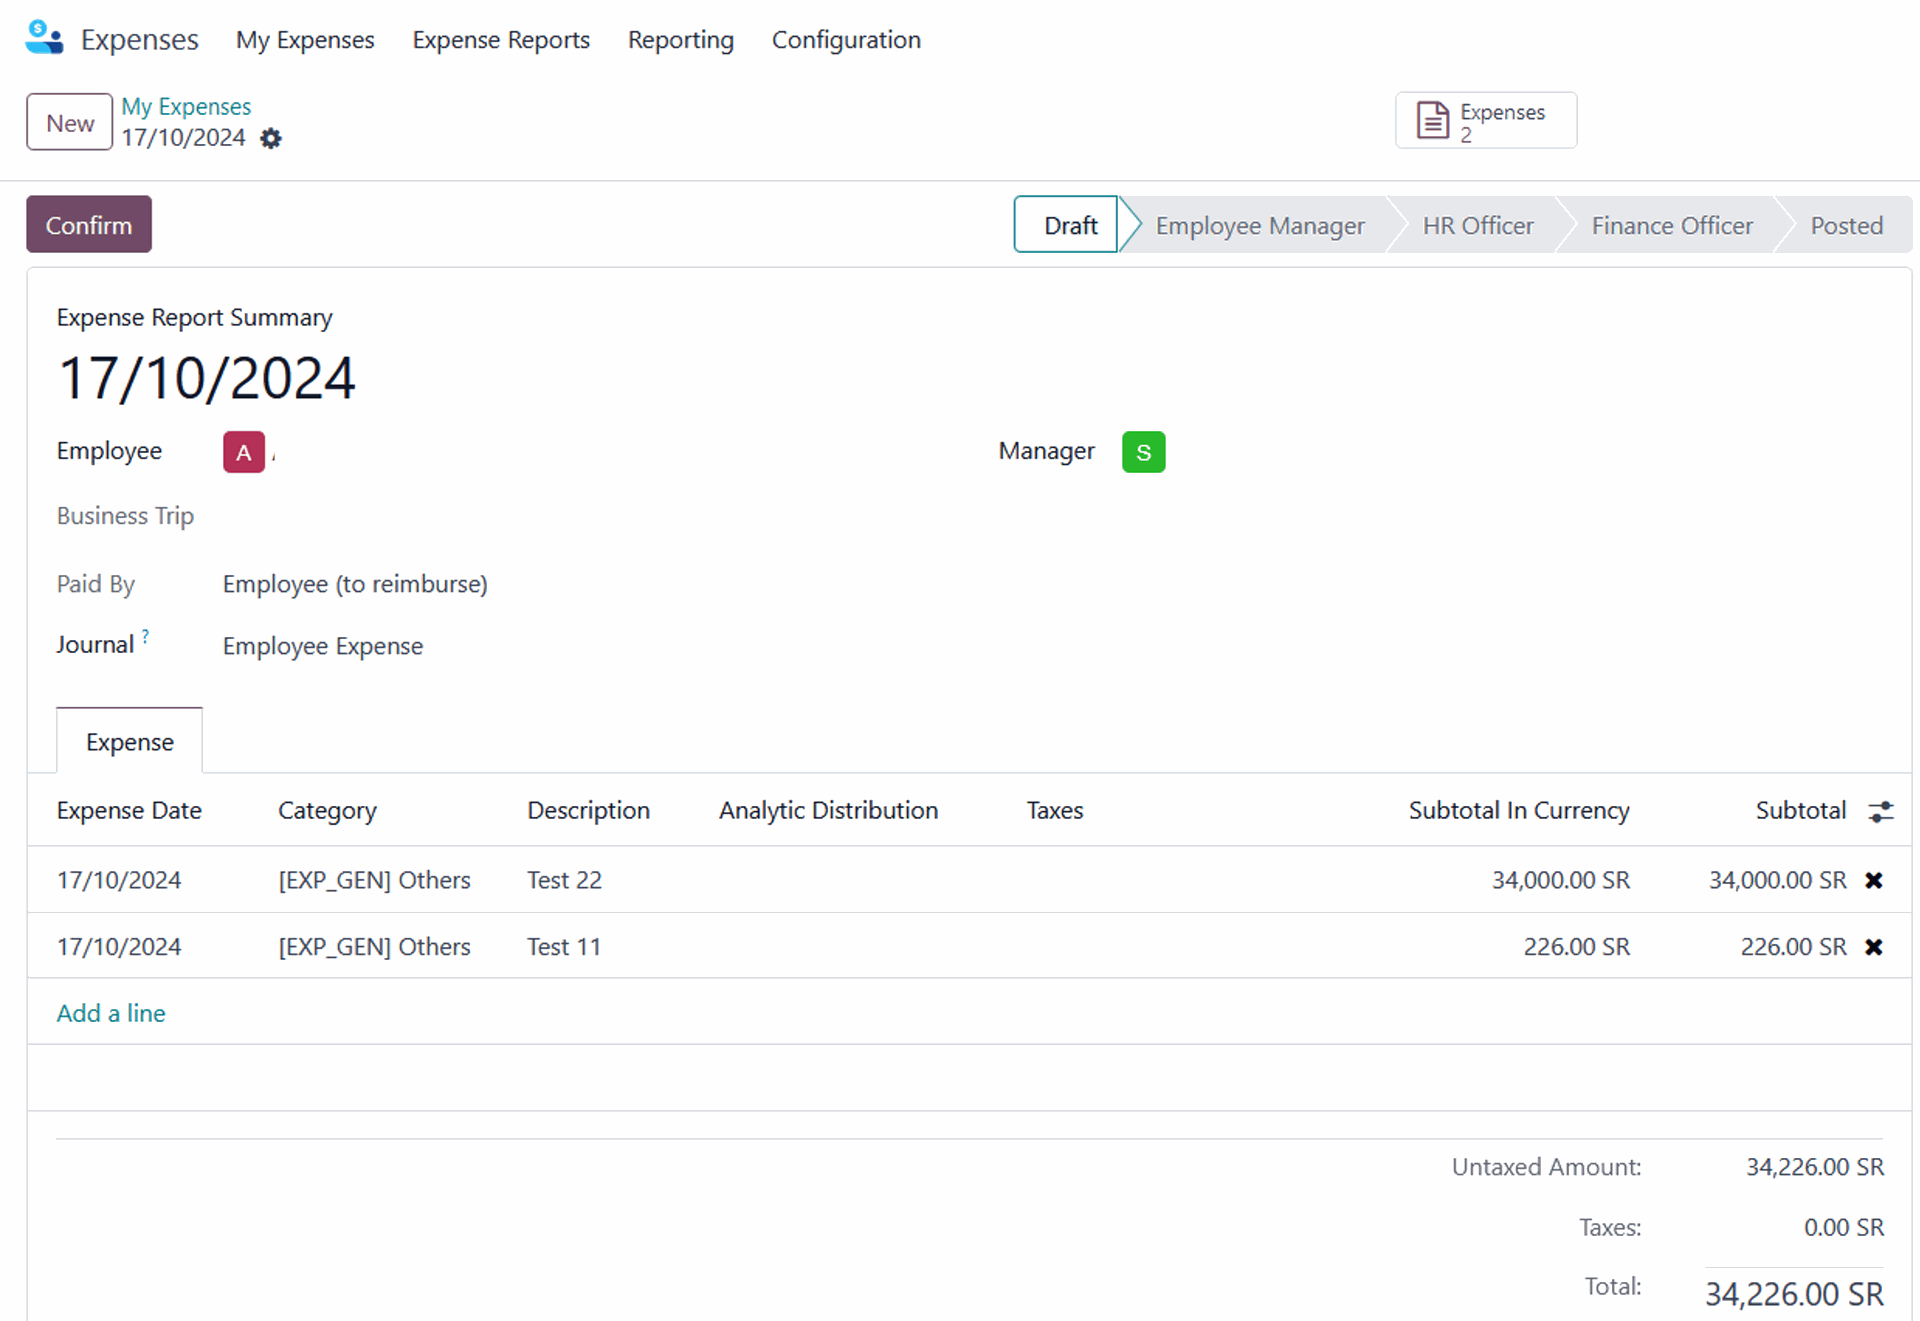
When you select one or more expenses and click on "Create Report," the report will include the one or more expenses you selected, as shown in the picture below

The two selection expenses will appear in one report, as the picture shown
Upon clicking "confirm," the request will be sent to the relevant approves for their approval. Once the final approval is granted, the expenses will be reimbursed to the employee via deposit or to the company
4. Traveler (Business Trip)
To access the module, click on the Traveler icon on the main menu screen, as illustrated in the image below

The page below will appear. You can return to the module list page by clicking on the top left icon highlighted in the red box or you can create a Traveler record by clicking on "New”

Then, fill in all the fields and click "Confirm” to submit the record for approval

5. Time Off
To access the module, click on the Time Off icon on the main menu screen, as illustrated in the image below
Time off
The following page will appear when clicking on My Time off in the My Time menu, as the picture below shown

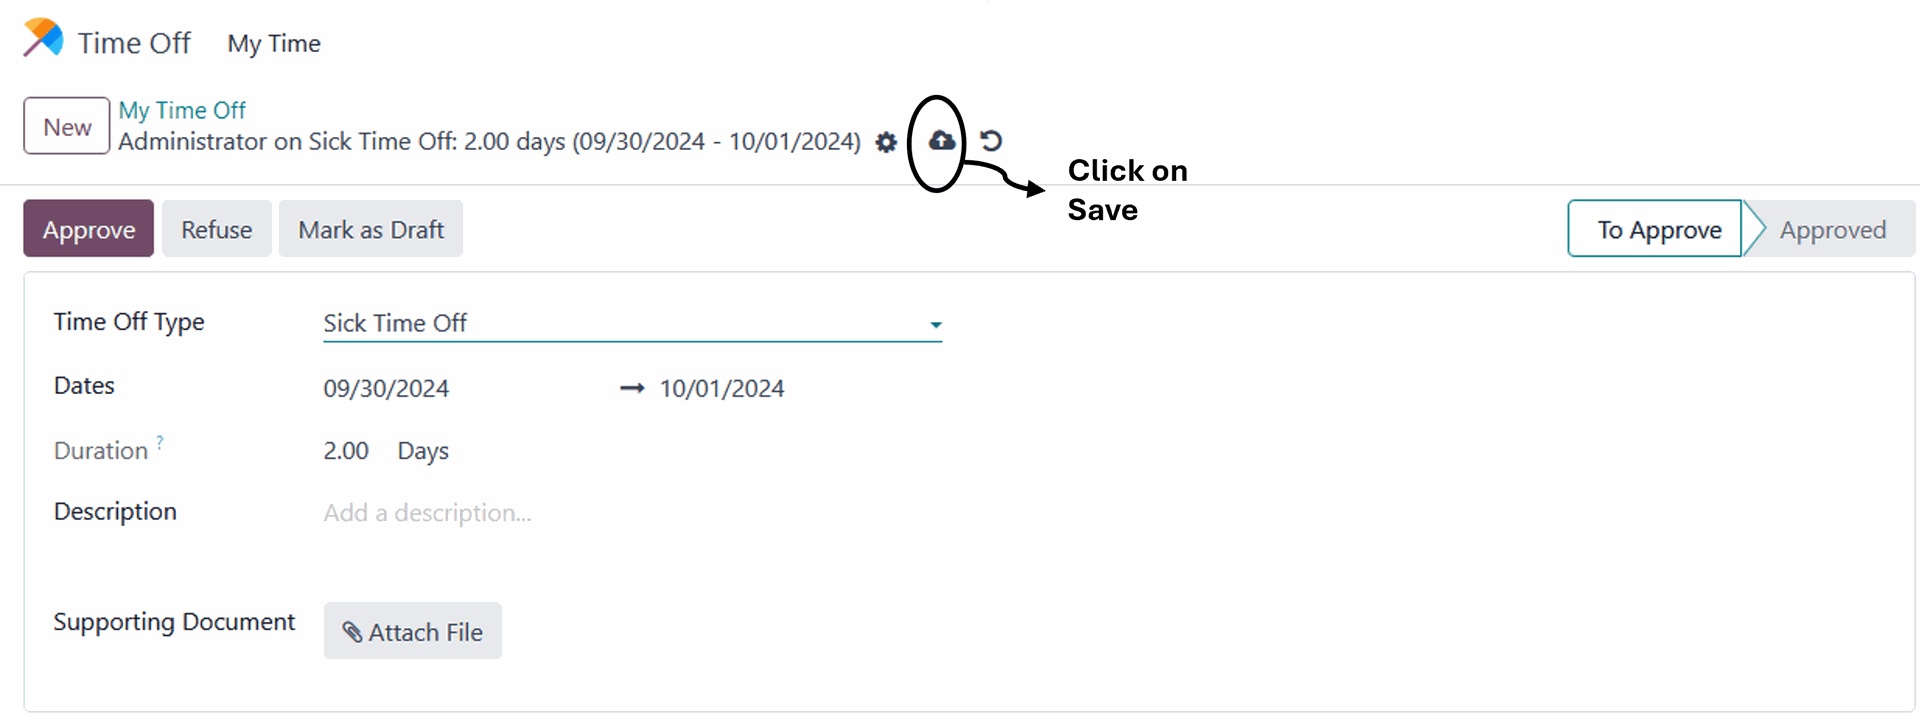
In the My Time Off page, you can create a leave request by clicking on "New"

After that, fill in all the required fields, ensuring that the duration is in days. Then click on "Save" to submit the request for approval, as shown below
Permission
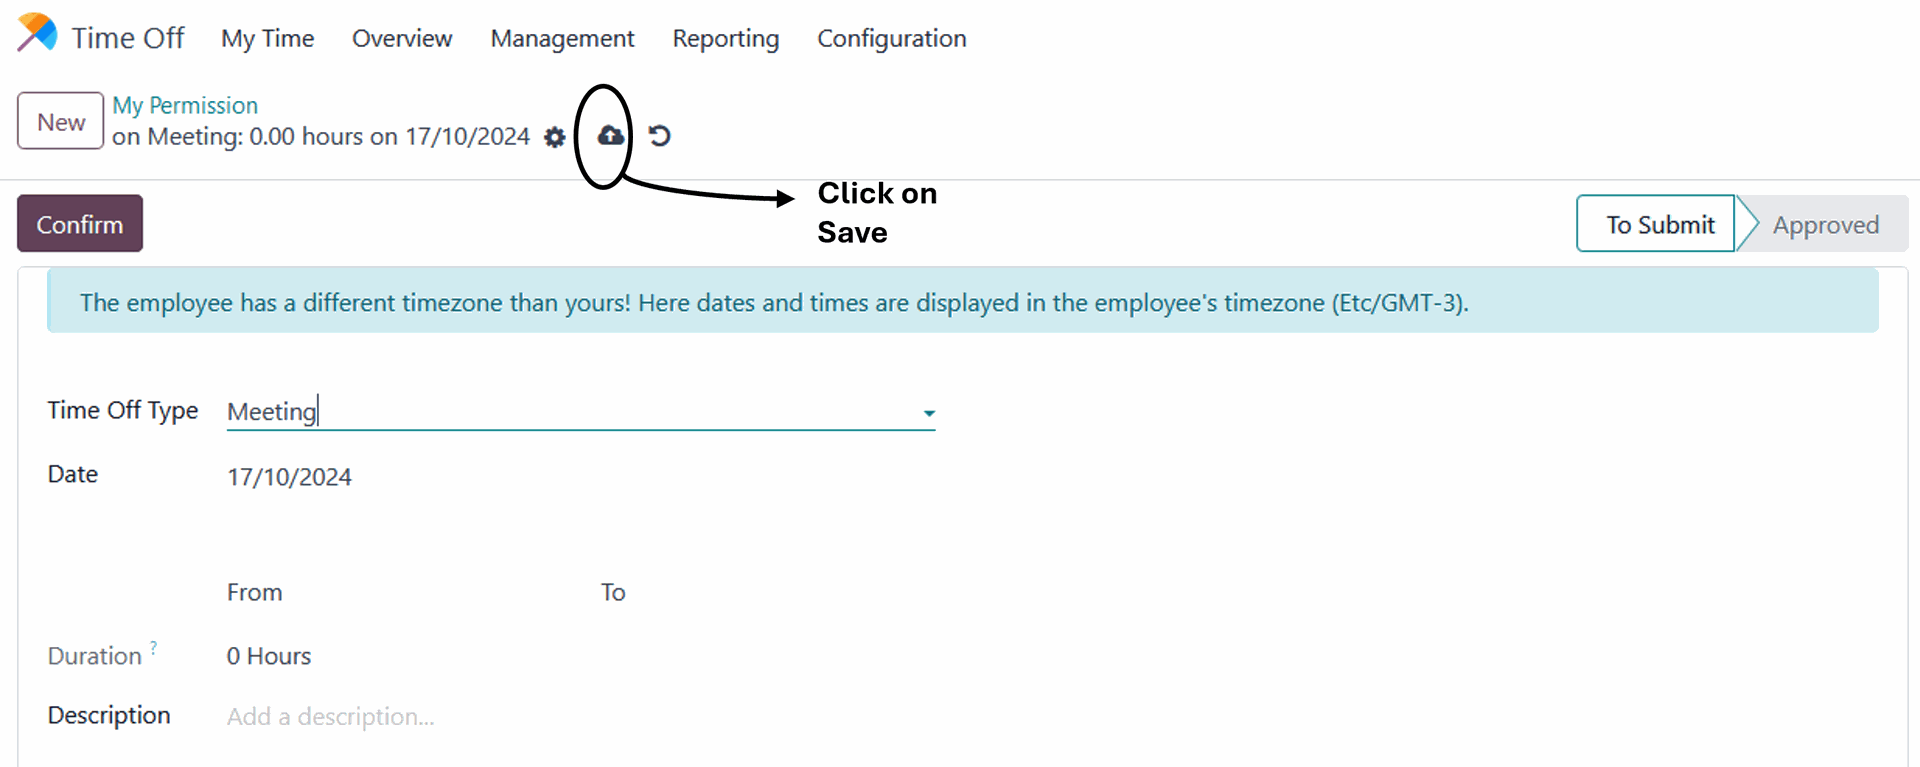
The following page will appear when clicking on My Permission in the My Time menu, as the picture below shown

In the My Permission page, you can create a leave request by clicking on "New"

After that, fill in all the required fields, ensuring that the duration is one day in hours. Then click on "Save" to submit the request for approval, as shown below
Ticket for non-Saudis
The following page will appear when clicking on My Time Off in the My Time menu, as the picture below shown

In the My Time Off page, you can create a leave request by clicking on "New"

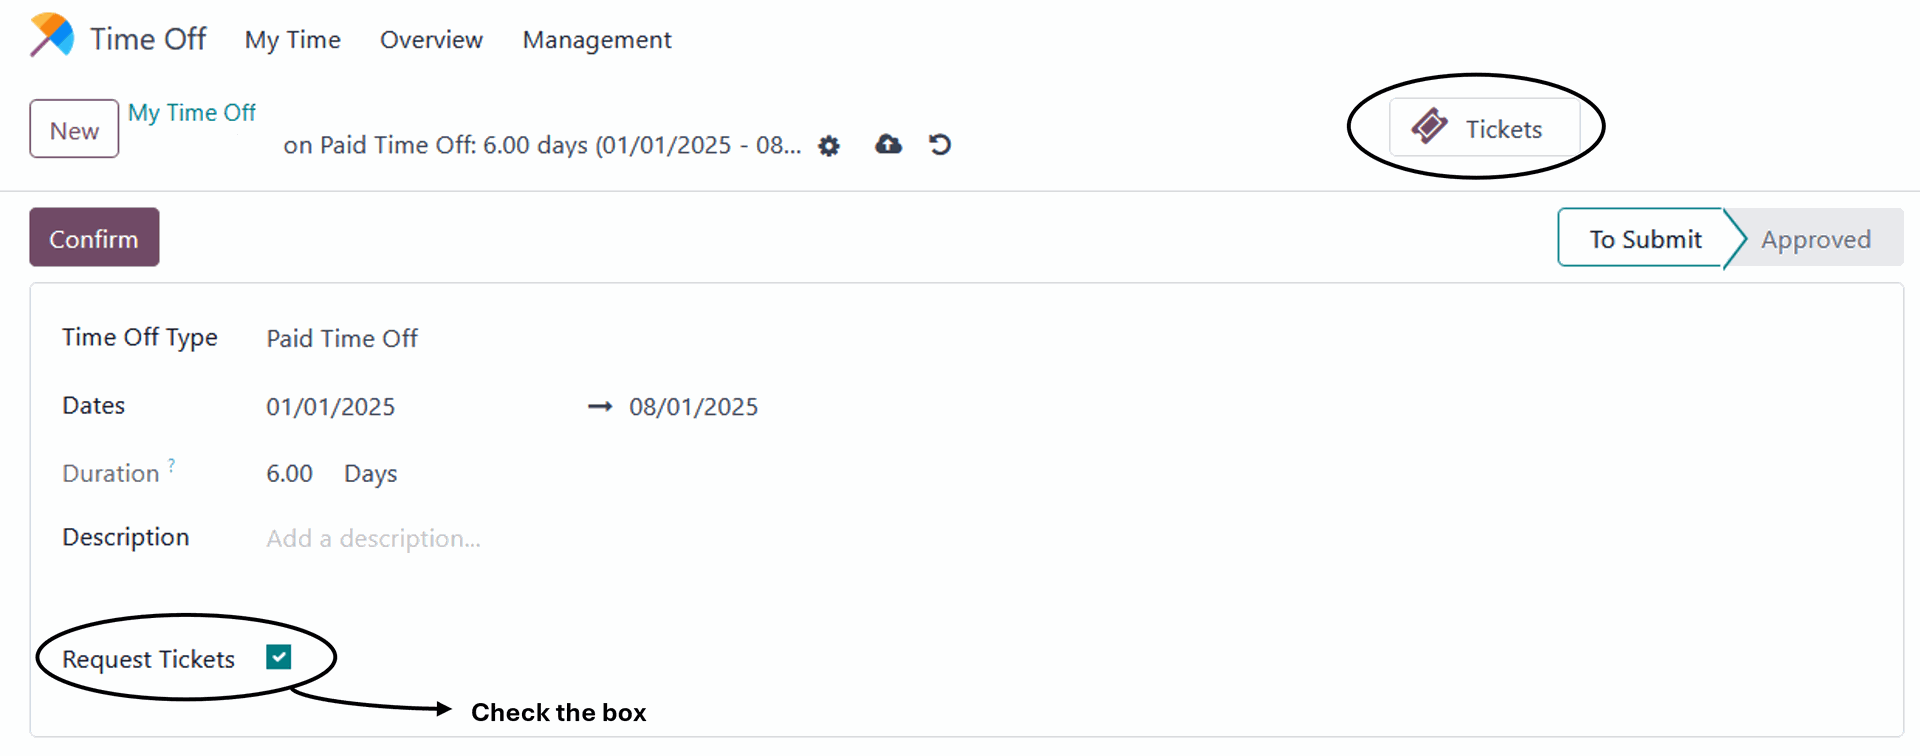
The "Request Tickets" feature is only for non-Saudi employees, as they are eligible to submit a request for a ticket for themselves and their families
As shown in the image below, only non-Saudi employees can select the option to request tickets after selecting the dates, then click on "Tickets" at the top of the screen. Additionally, requests can only be submitted for Paid Time Off type
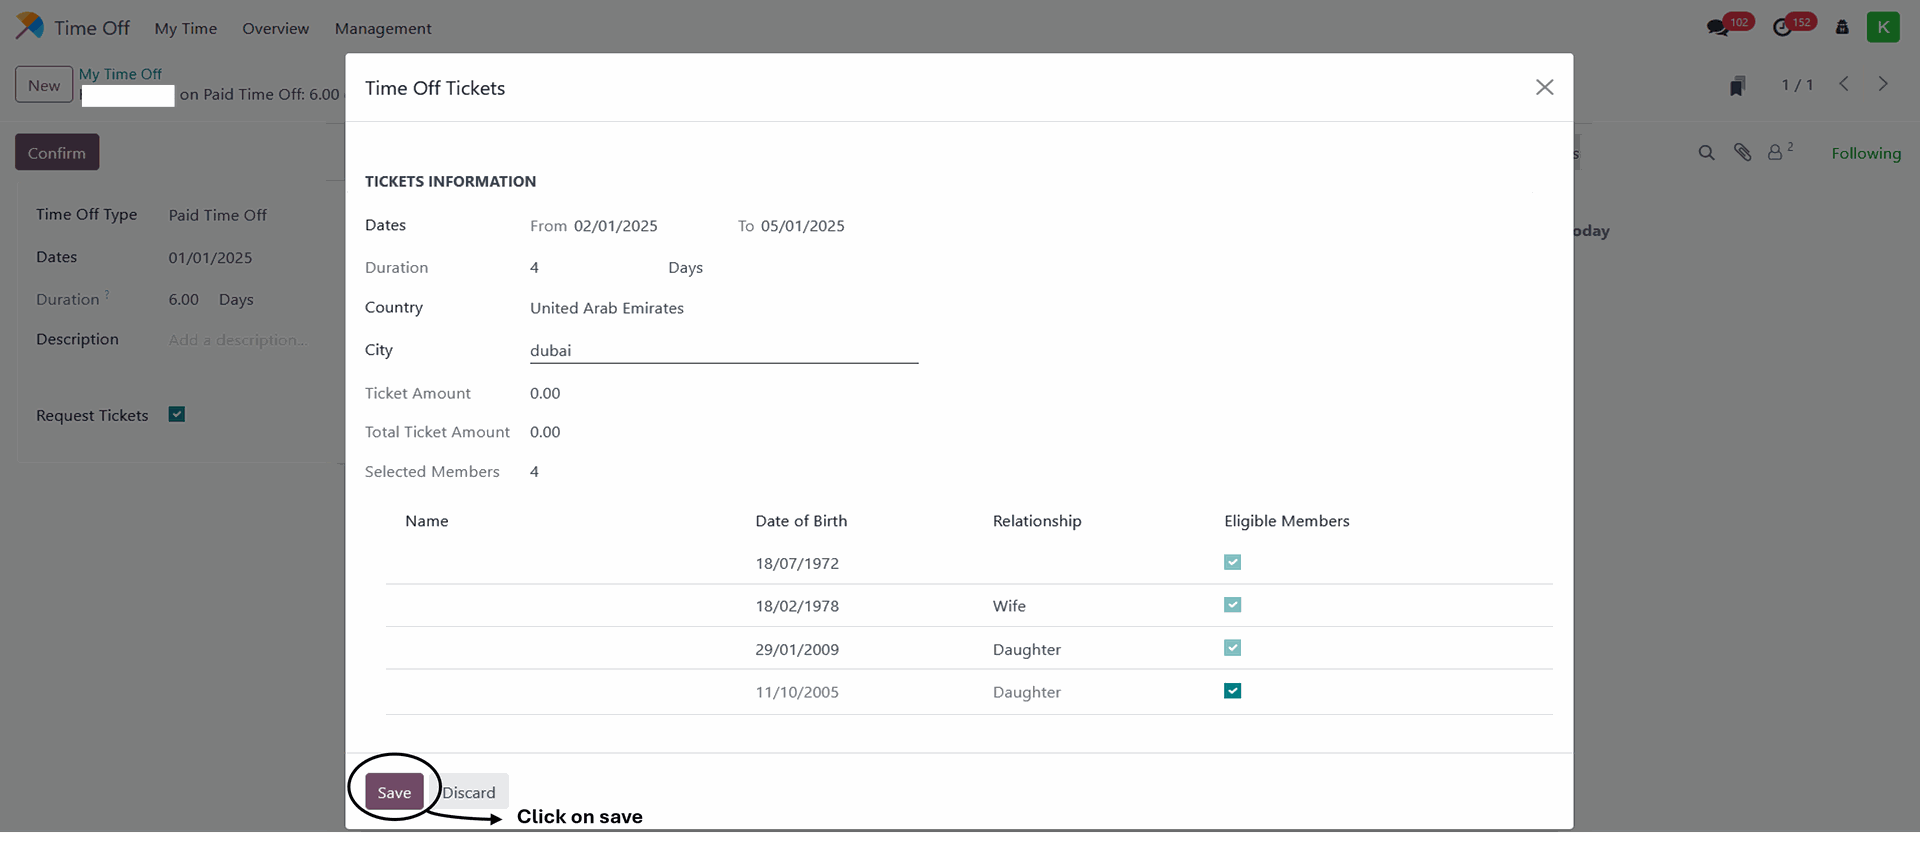
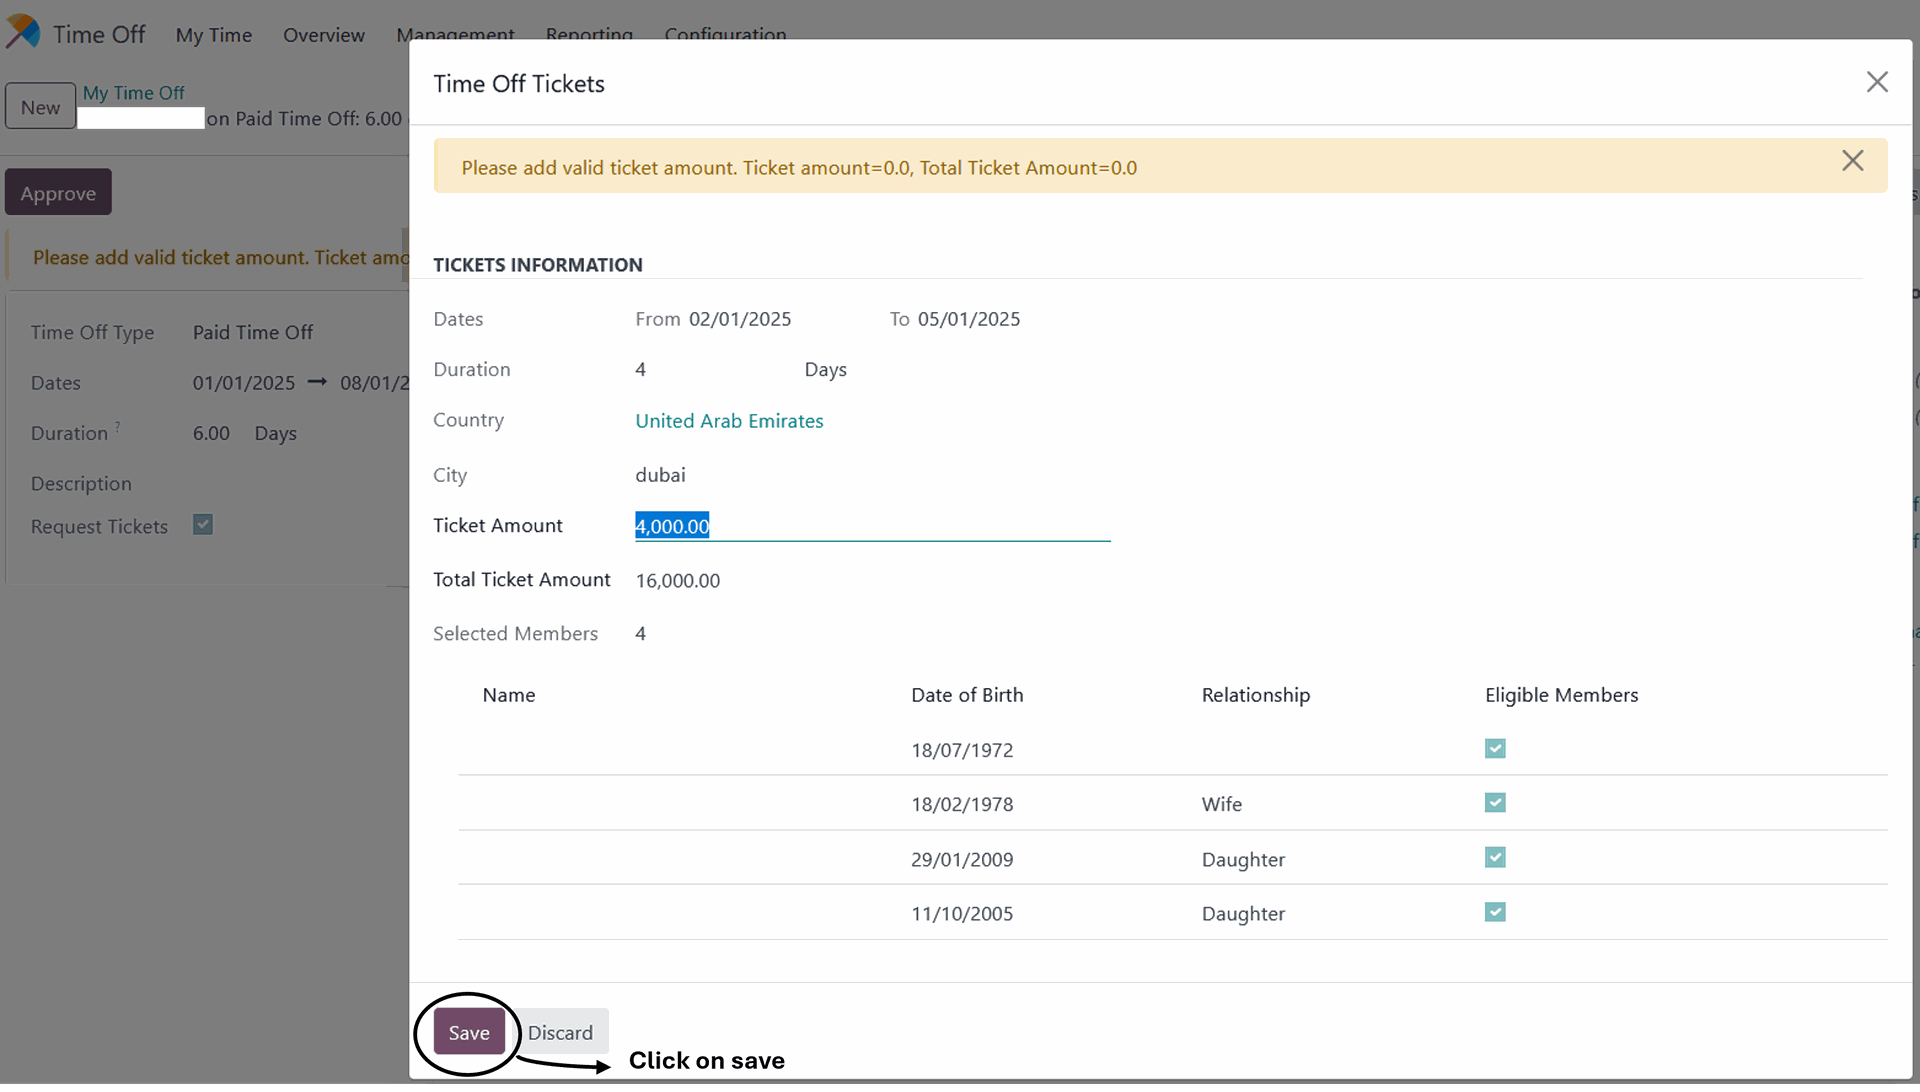
"When you click on the 'Tickets' button, the Time Off Tickets window will appear. The employee can fill in all the required fields, including the dates (the selected dates should be within the duration of the time off), country, city, and select the eligible member they want to add. Then, click 'Save’ and confirm
When all parties involved approve the ticket request. The ticket officer should add a ticket amount by clicking on the 'Tickets' button
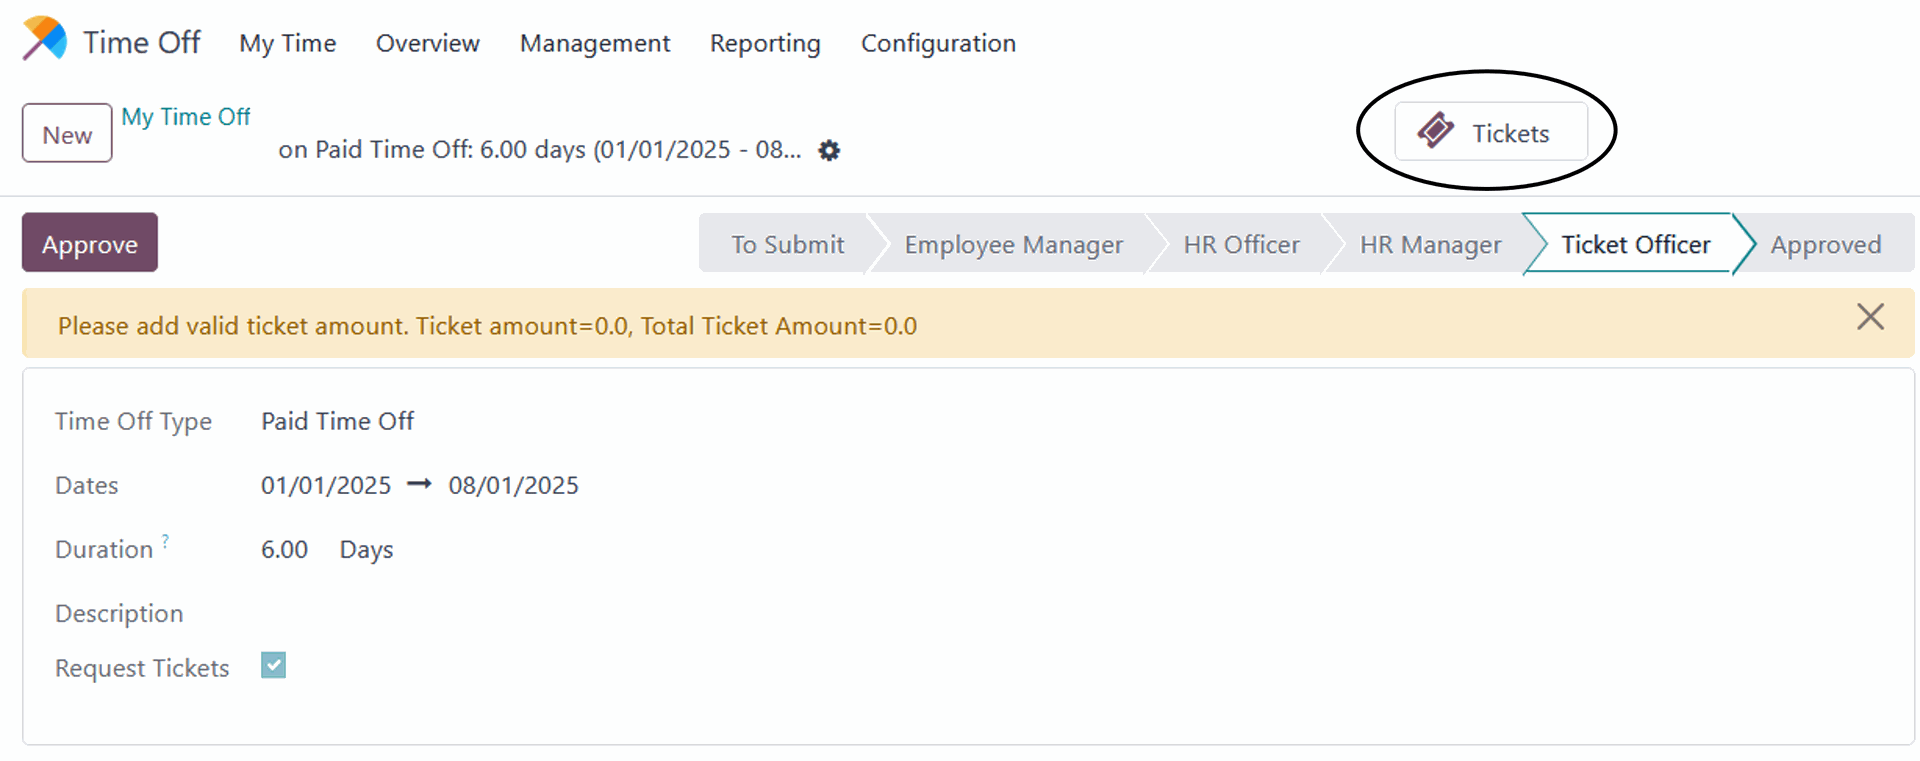
Upon clicking the 'Tickets' button, the officer can enter the amount for the ticket, and the total amount will be calculated automatically based on the number of members. Then, click “Save”.
The ticket officer can click on 'Approve' after entering the amount of the tickets for the employee, then the request will approved.

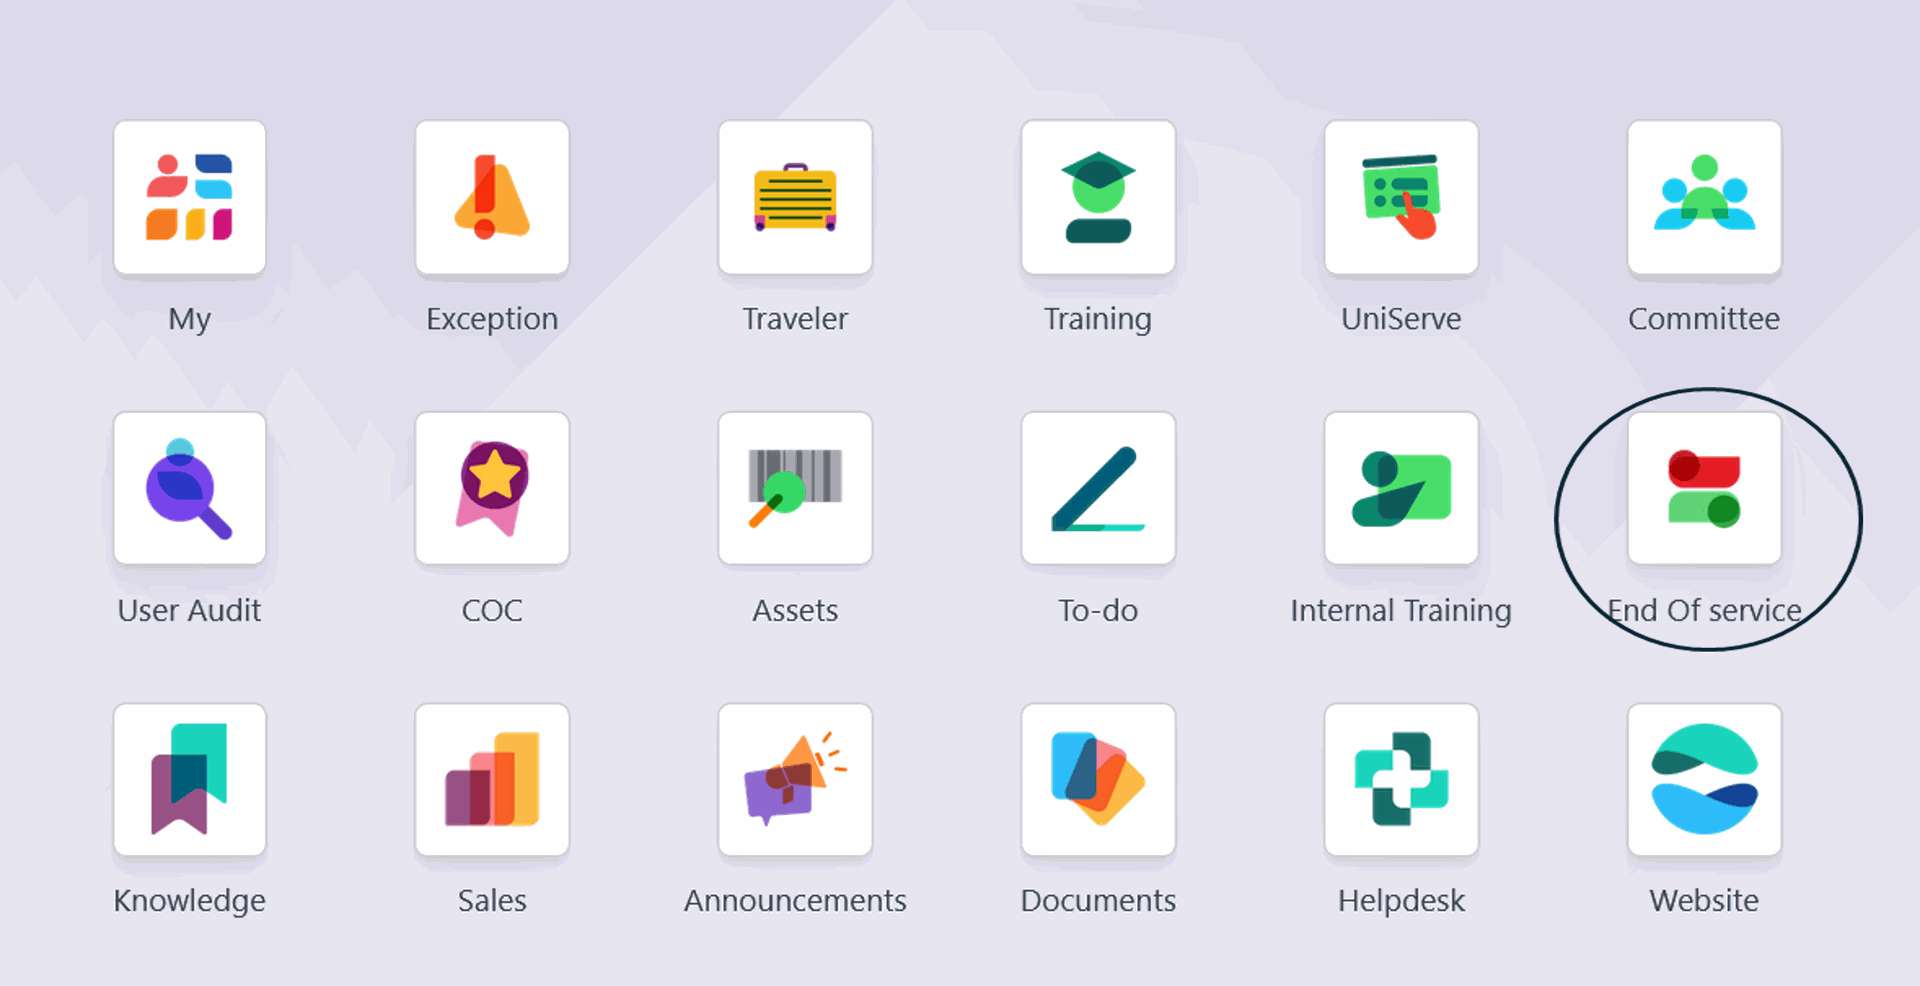
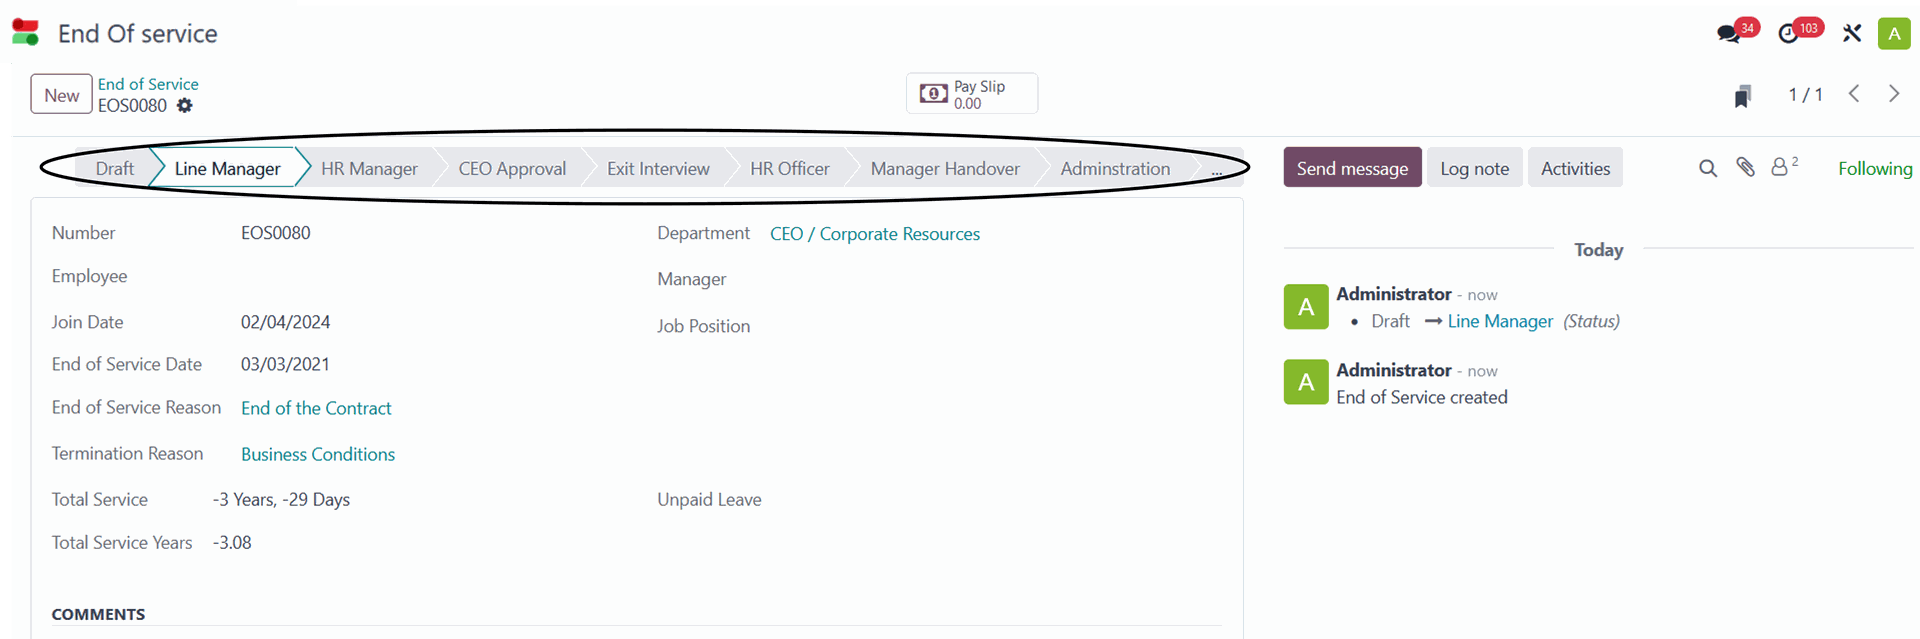
6. End Of Service
To access the module, click on the End Of Service icon on the main menu screen, as illustrated in the image below
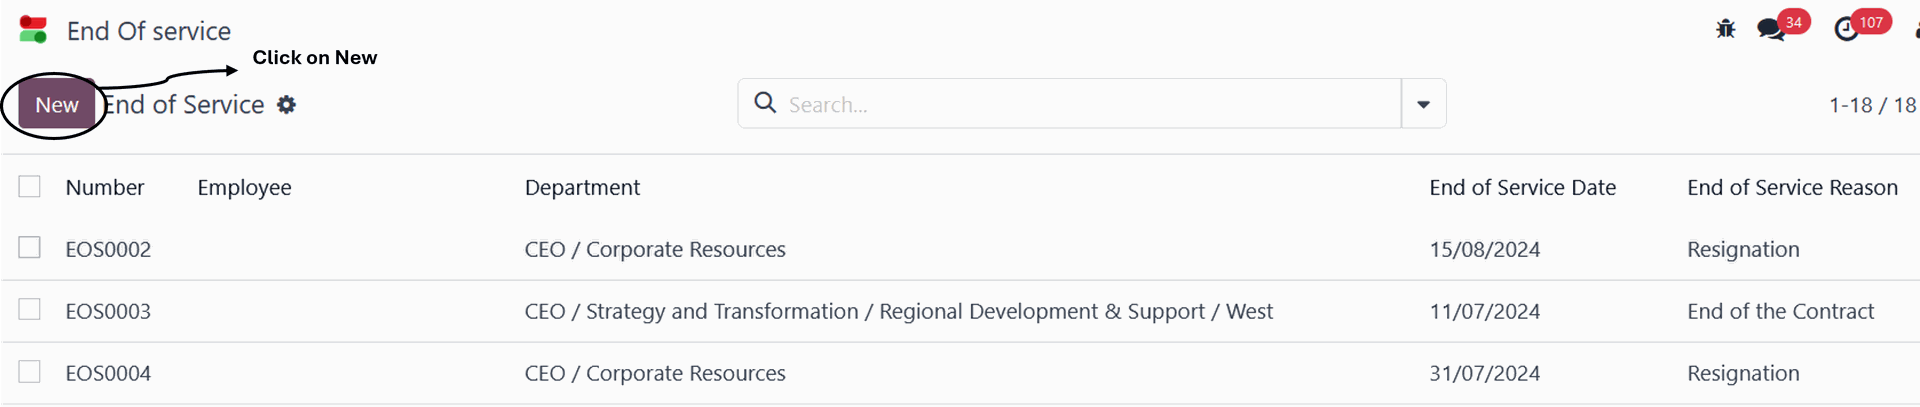
you can create a end of service request by clicking on "New"
When you click on 'New,' the following page will appear. fill in all required fields. then, click on Save and confirm
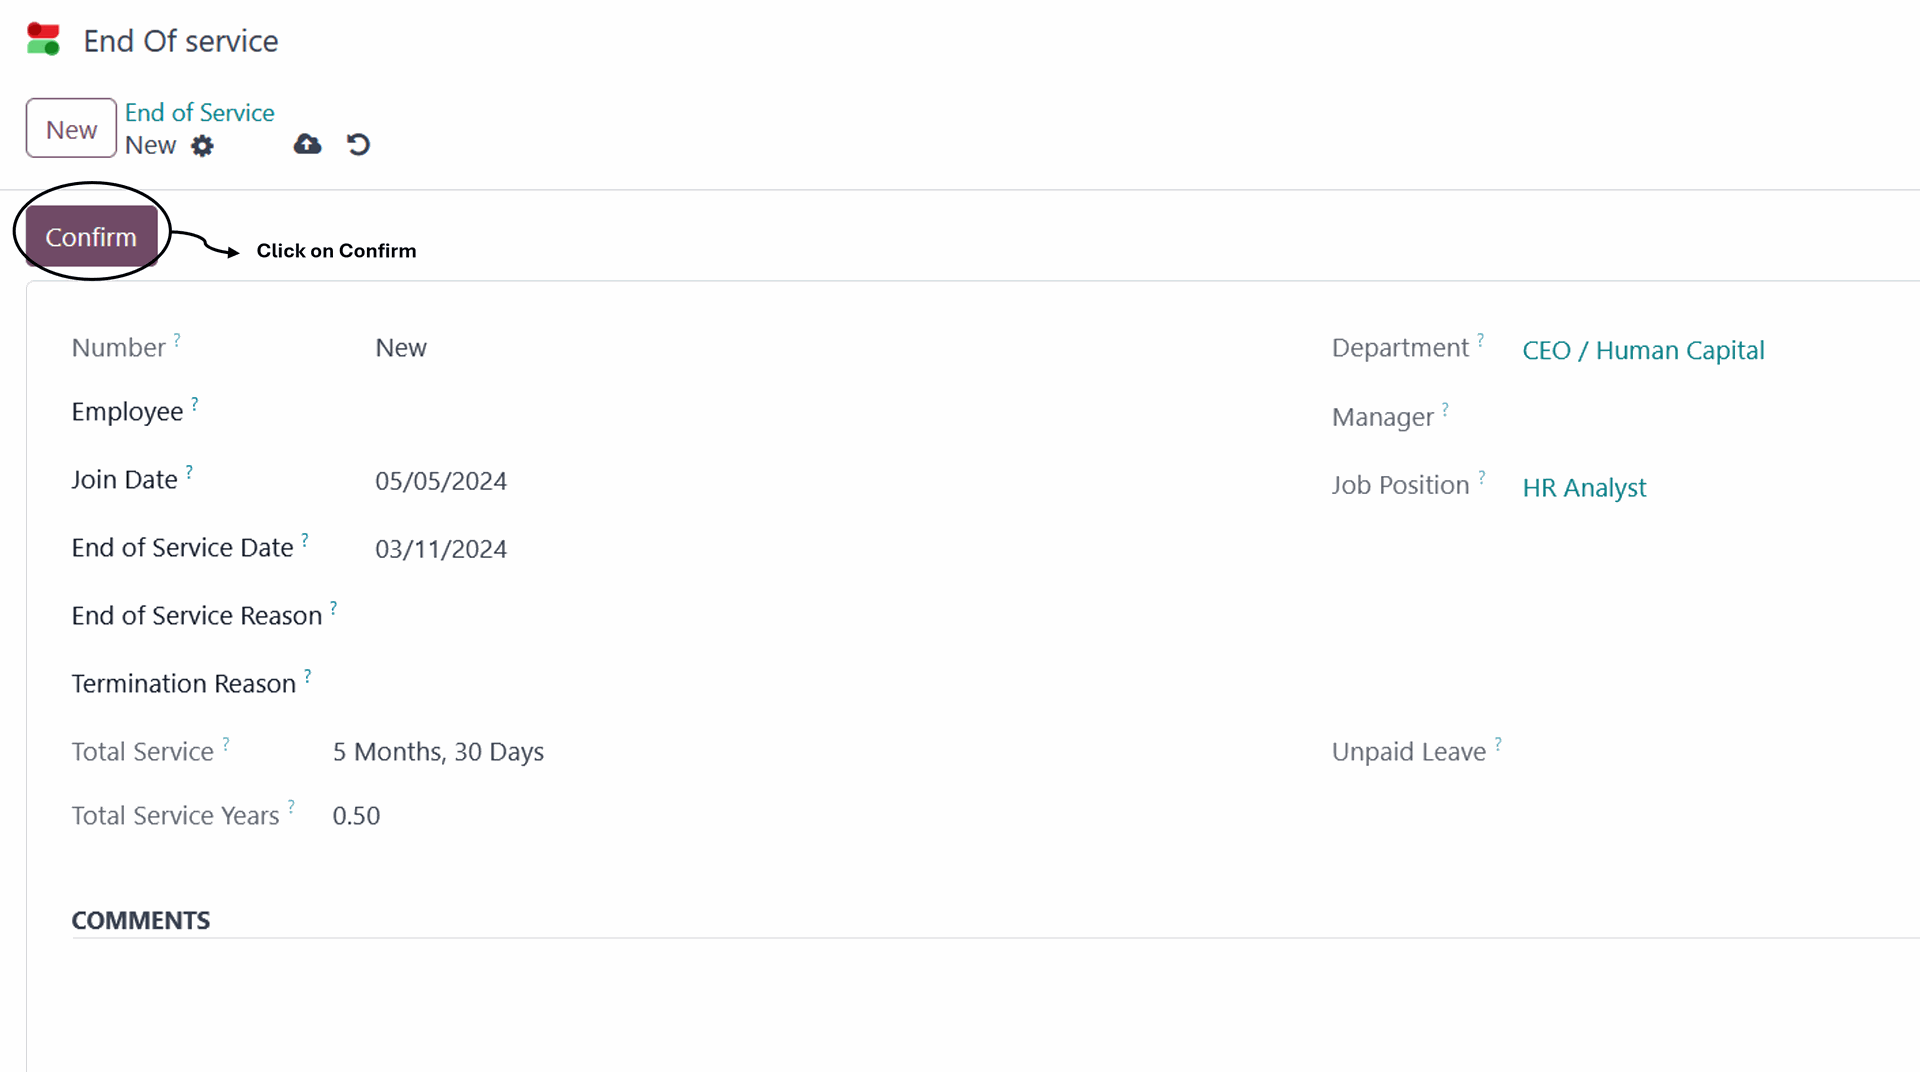
The end-of-service request will be sent to the relevant departments for their approval. Upon final approval, the official procedures for terminating the employee's end of service will be carried out
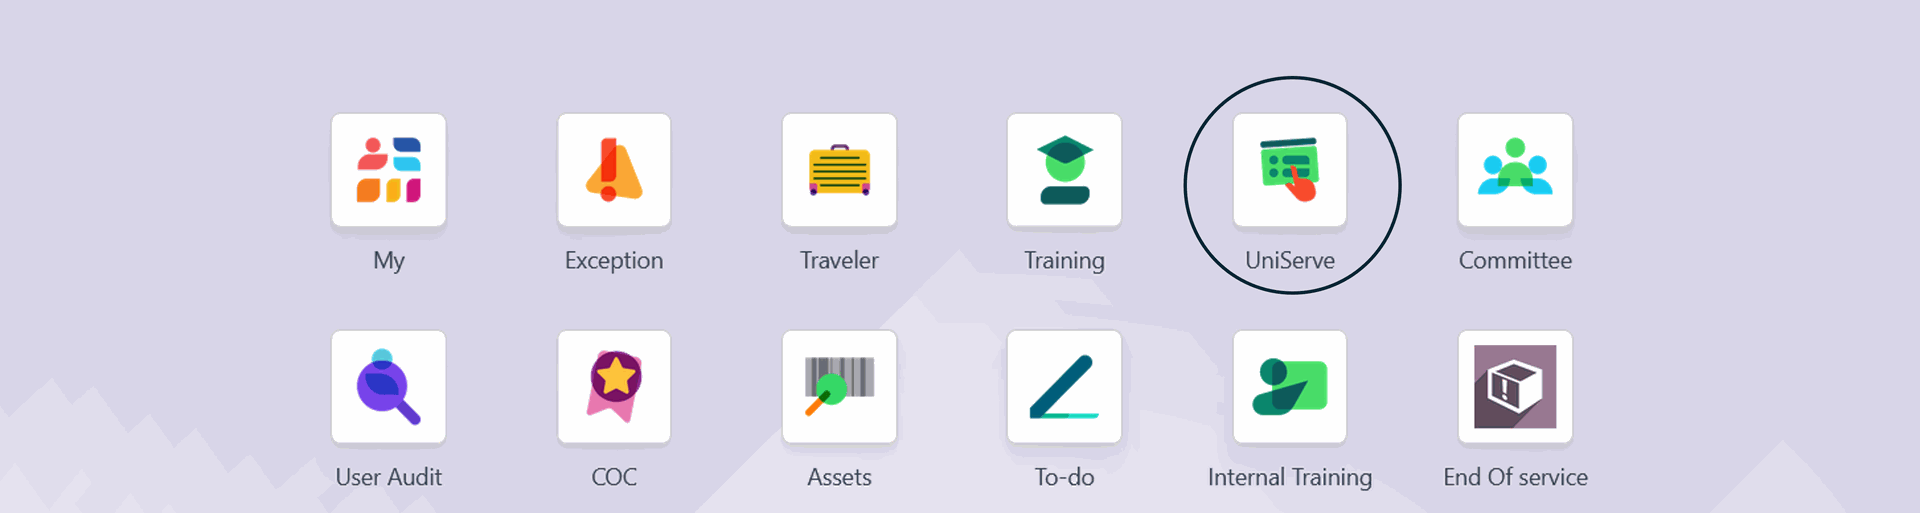
7. Education Allowance Request
To access the Education Allowance request page, click on the "UniServe" module icon from the main menu screen
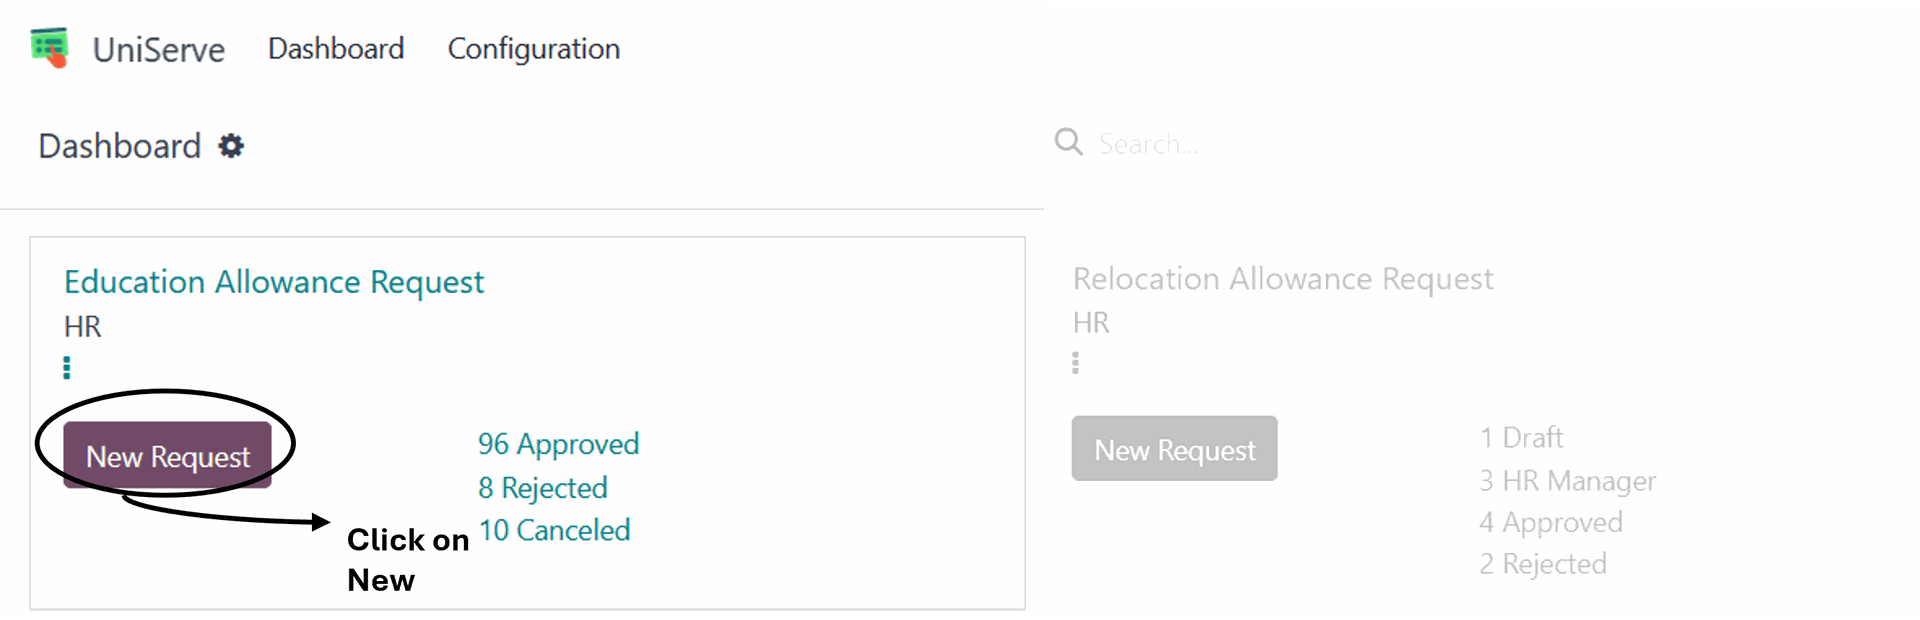
Click on the "New Request" for Education Allowance on the dashboard page
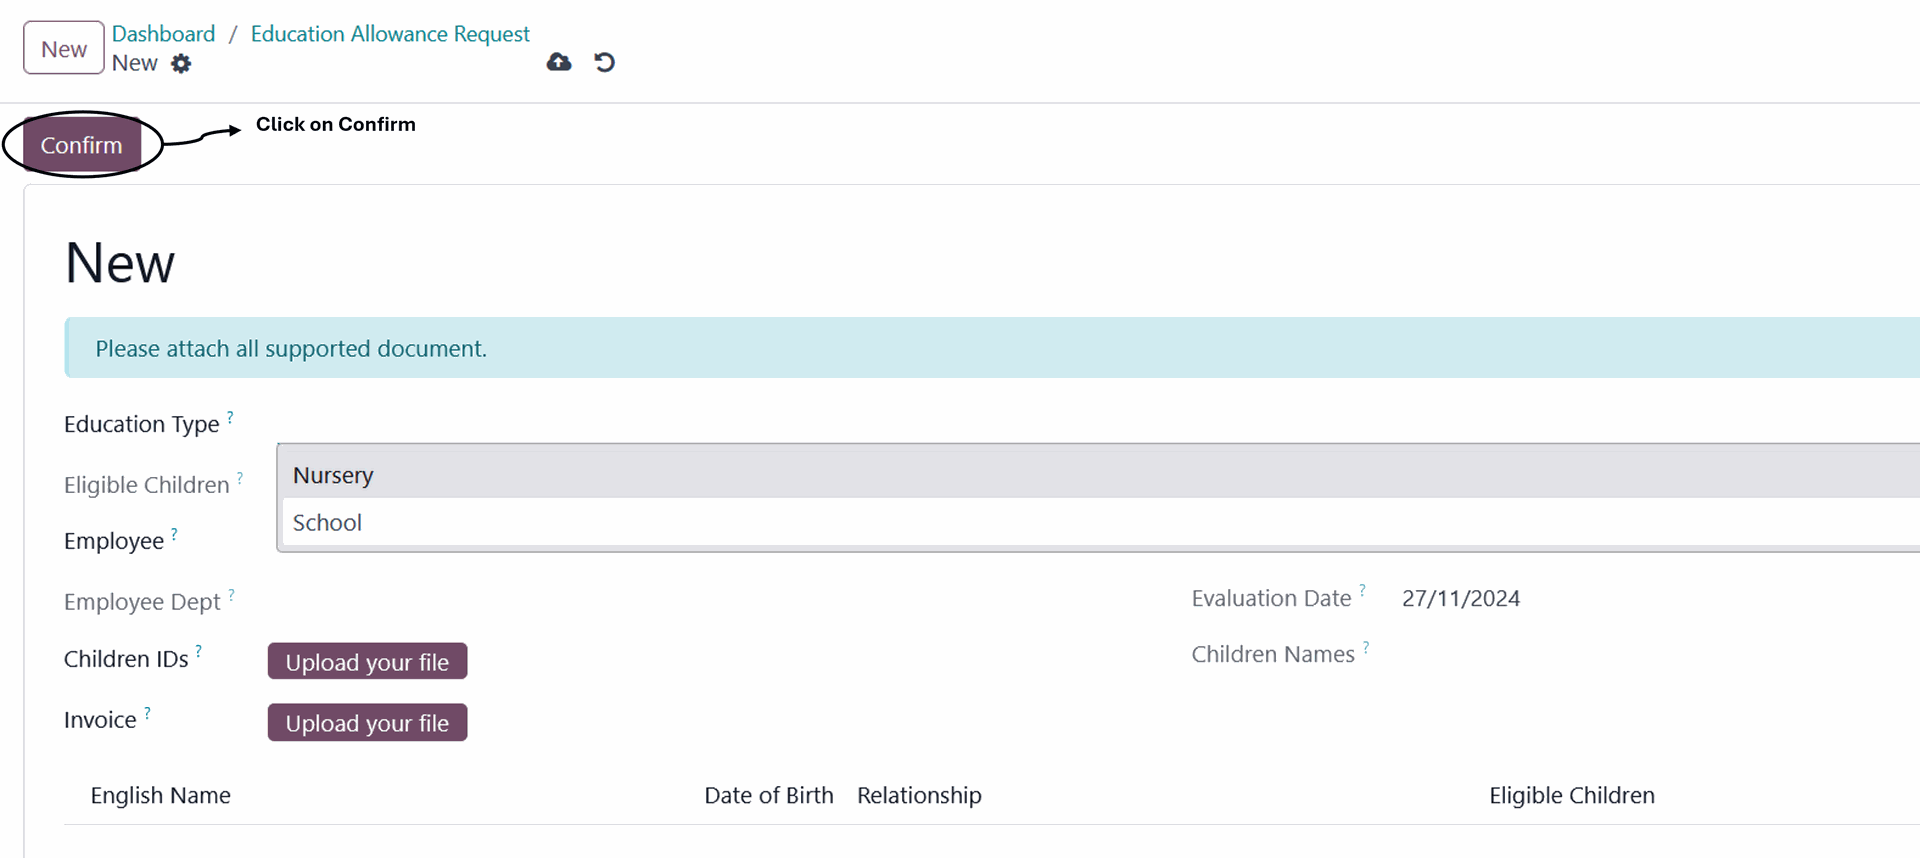
Upon accessing the request page, the children of the employee will be displayed automatically once the Education type is selected. The employee must complete the other mandatory fields, such as "Education Type, Children ID, Invoice," and then proceed by clicking on Submit
The nursery type is exclusively for female employees, while the school type can be requested by all employees
The request will be submitted to the appropriate parties for approval or rejection, and after receiving final approval, the allowance amount will be issued
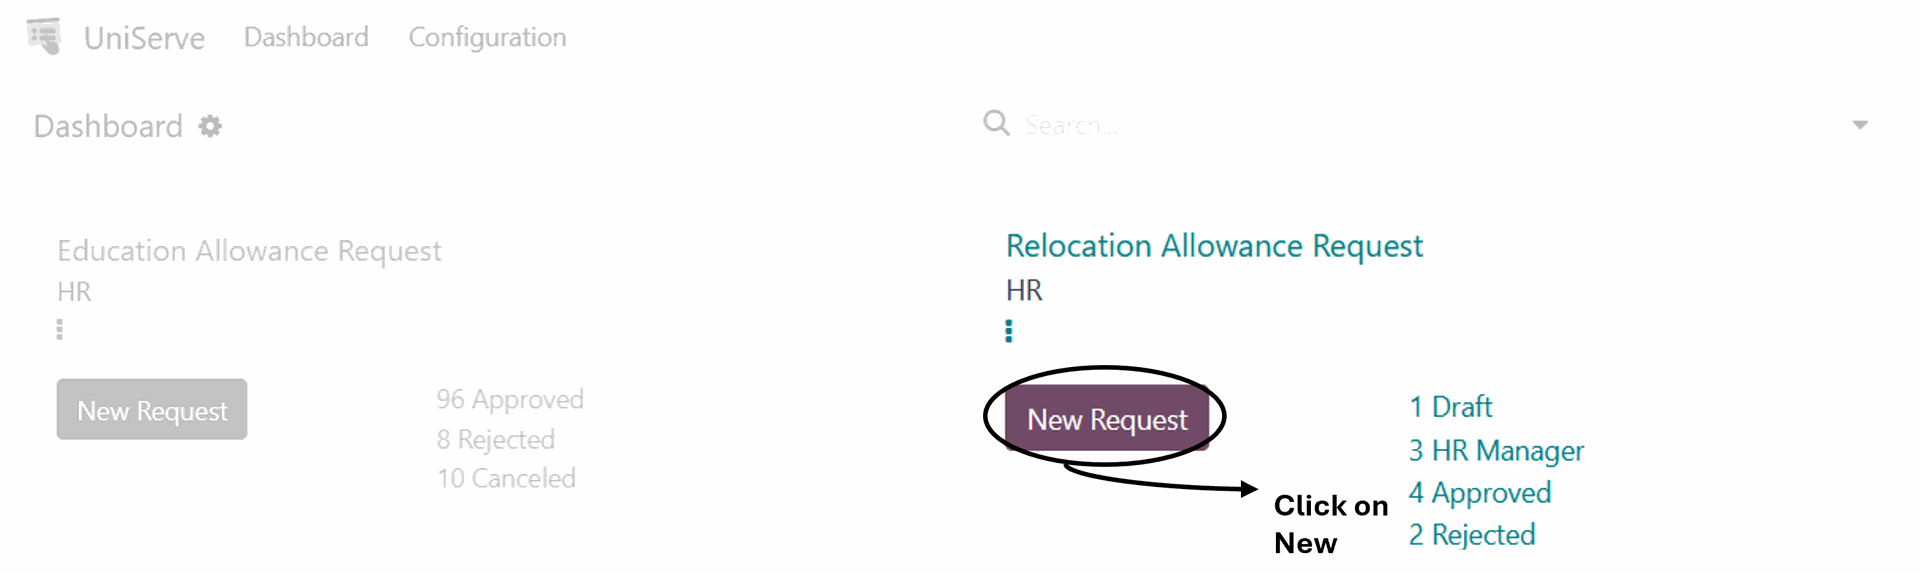
8. Relocation Allowance Request
To access the Relocation Allowance request page, click on the "UniServe" module icon from the main menu screen
Click on the "New Request" for Relocation Allowance on the dashboard page
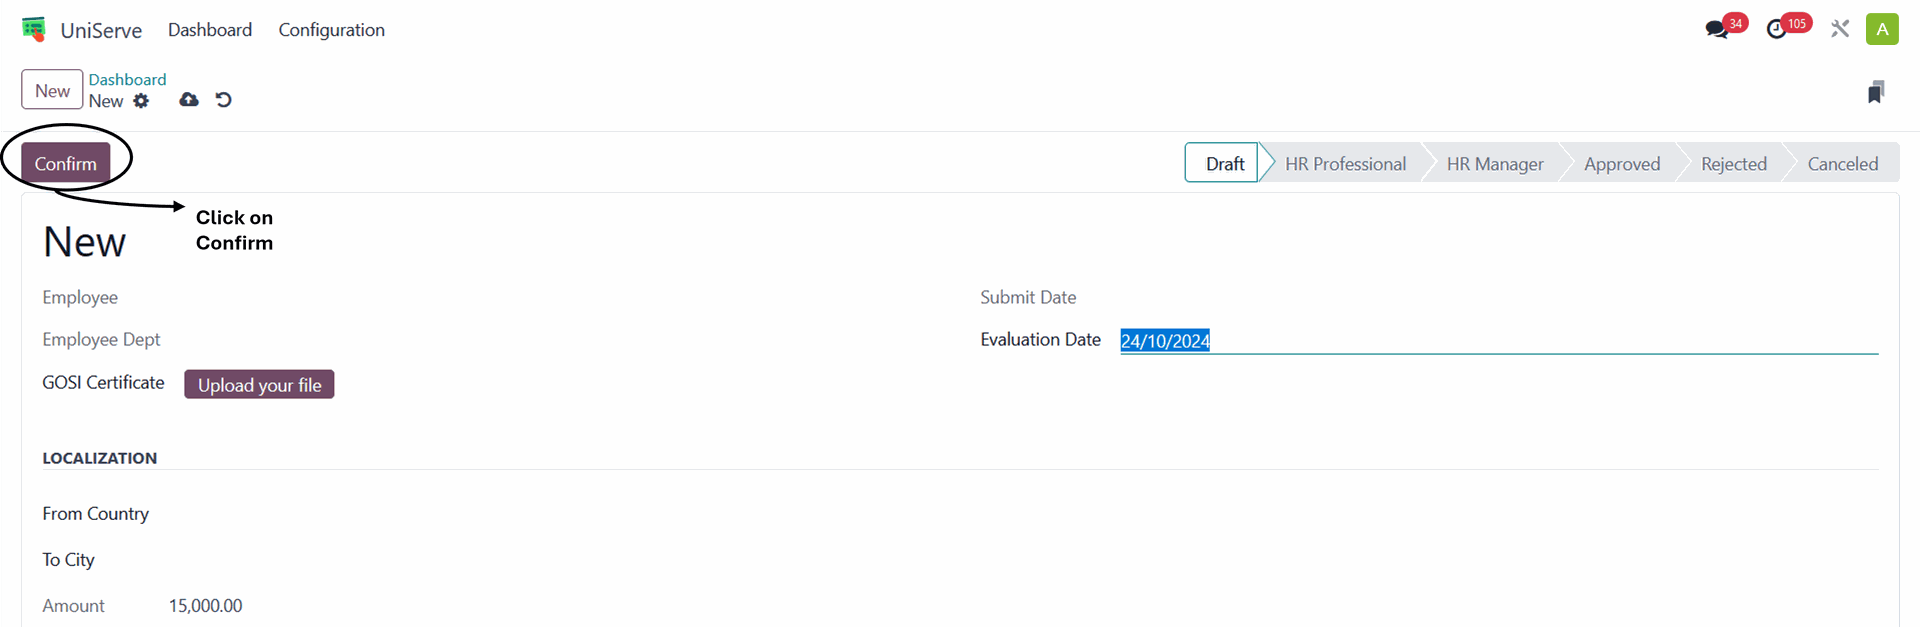
When accessing the request page, the employee's information will appear automatically .The employee should fills in the required fields, including "GOSI certificate" and then clicks on Submit
The employee should enter information about the country they are coming from and the city where they will be settling for work.
The request will be submitted to the appropriate parties for approval or rejection, and after receiving final approval, the allowance amount will be issued
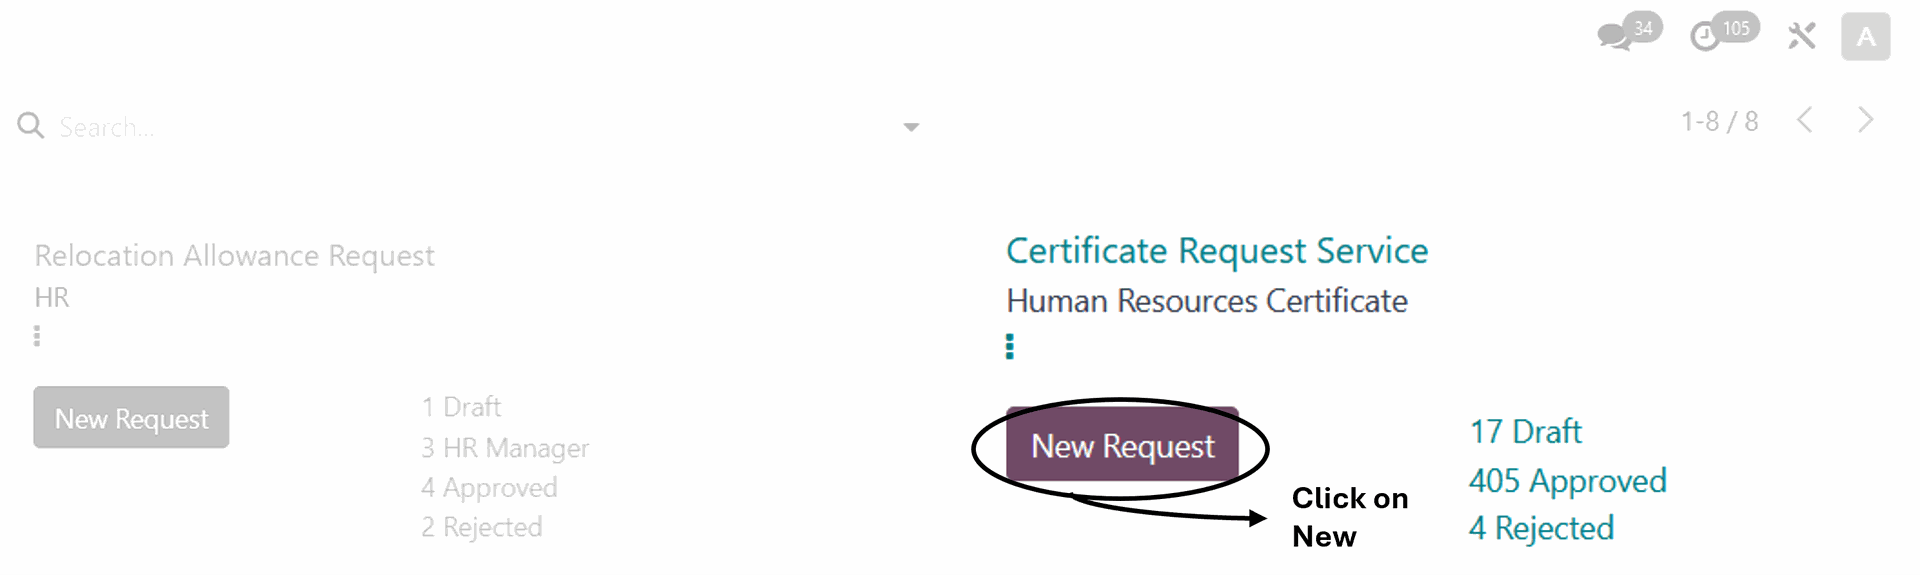
9. Certificate Request Service
To access the Certificate Request Service page, click on the "UniServe" module icon from the main menu screen
Click on the "New Request" for Certificate Request Service on the dashboard page
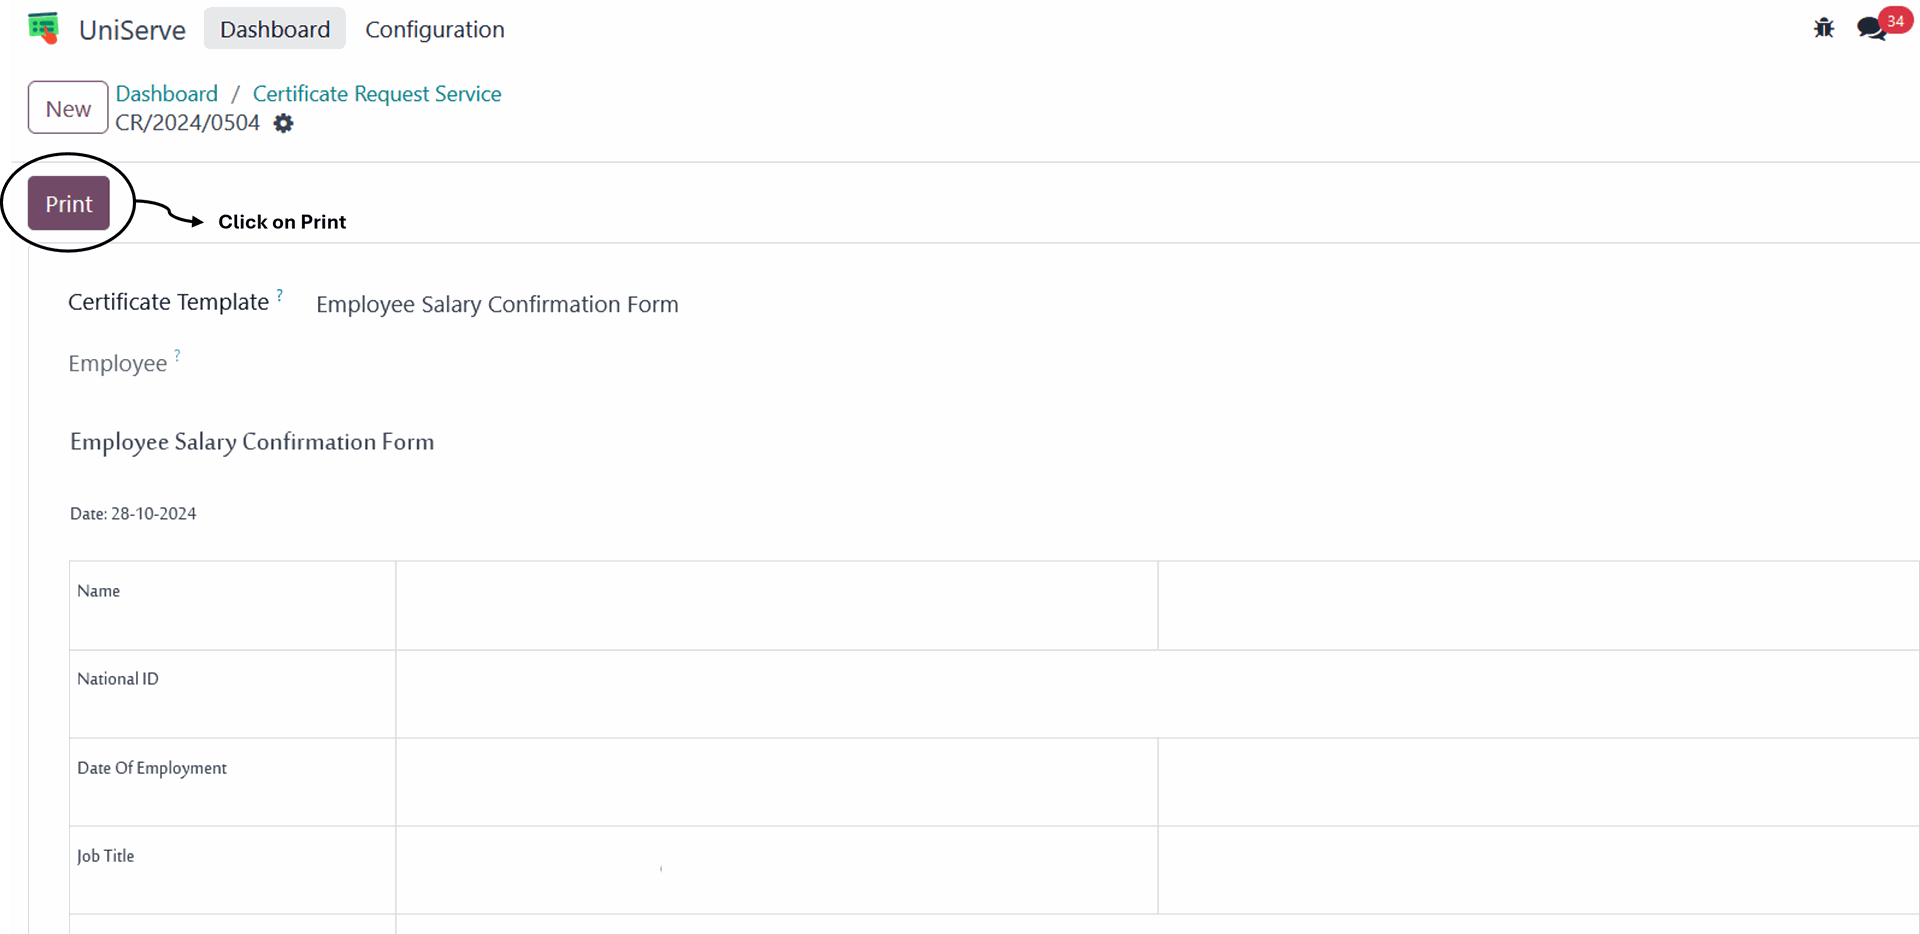
When accessing the request page. The employee fills in the required field "Certificate Template"then click on confirm

Upon clicking "Confirm" the employee can print the certificate
10. Exit Re-Entry
To access the Exit Re-Entry page, click on the "UniServe" module icon from the main menu screen
Click on the "New Request" for Exit Re-Entry Service on the dashboard page
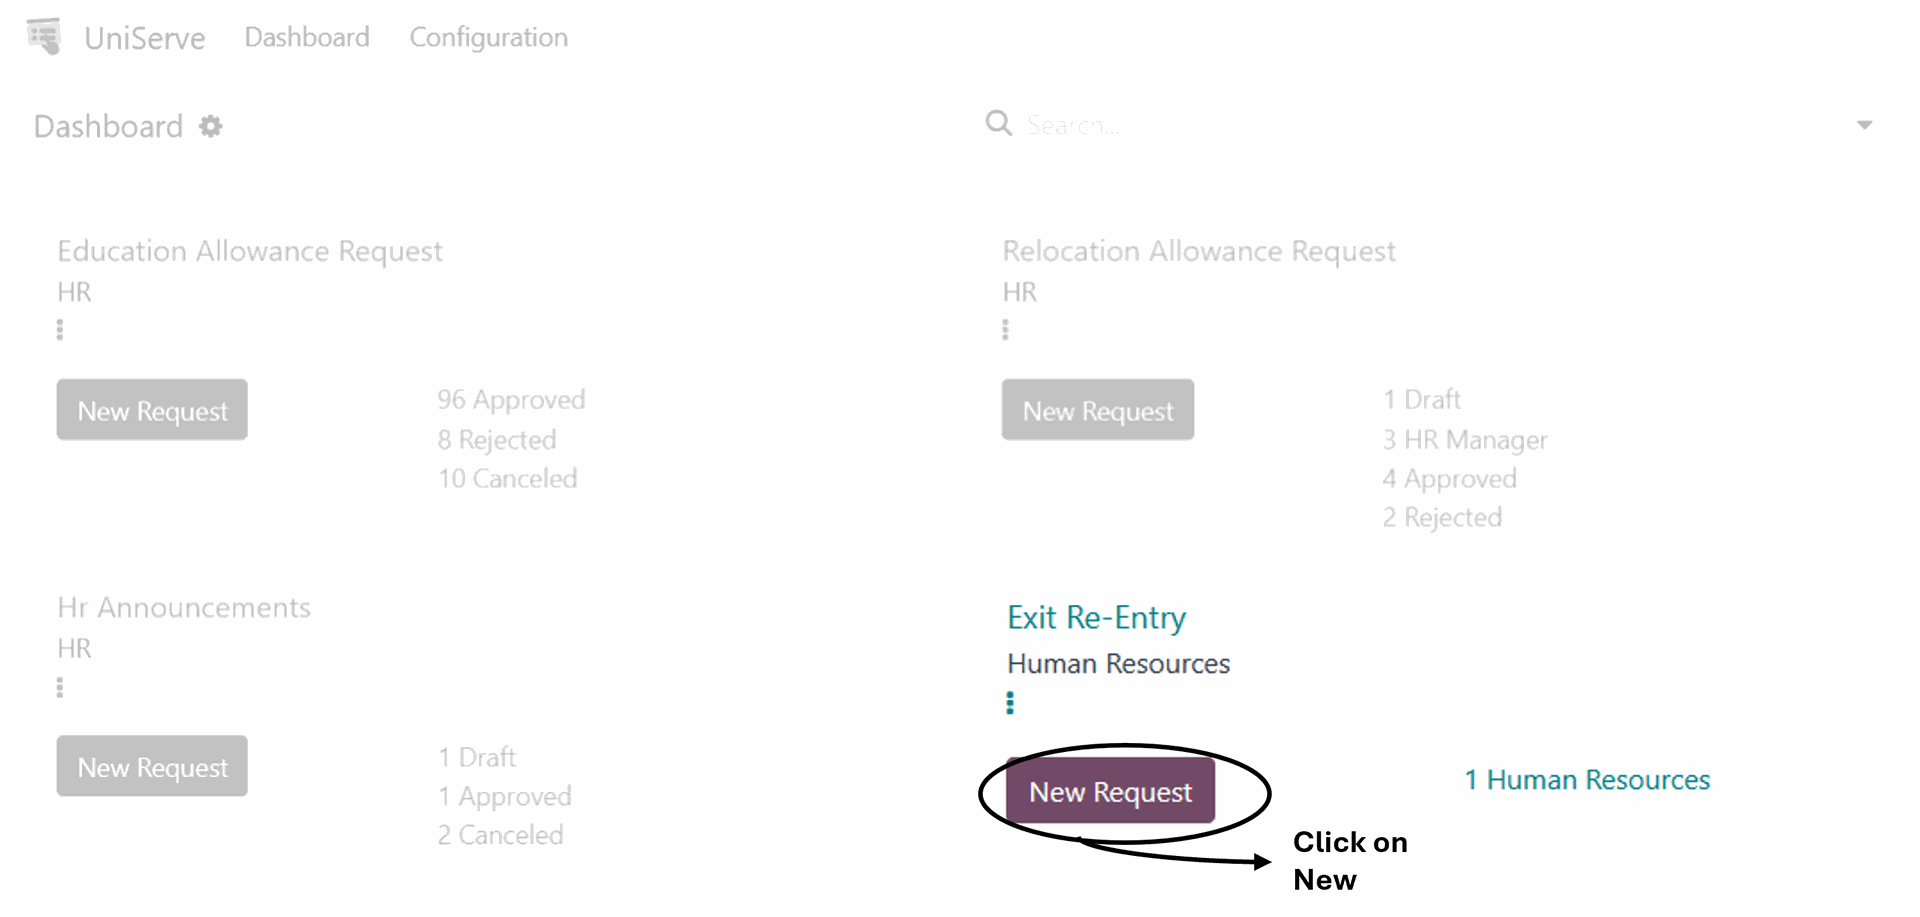
This service is available only for non-Saudi employees, who can submit an Exit Re-Entry request
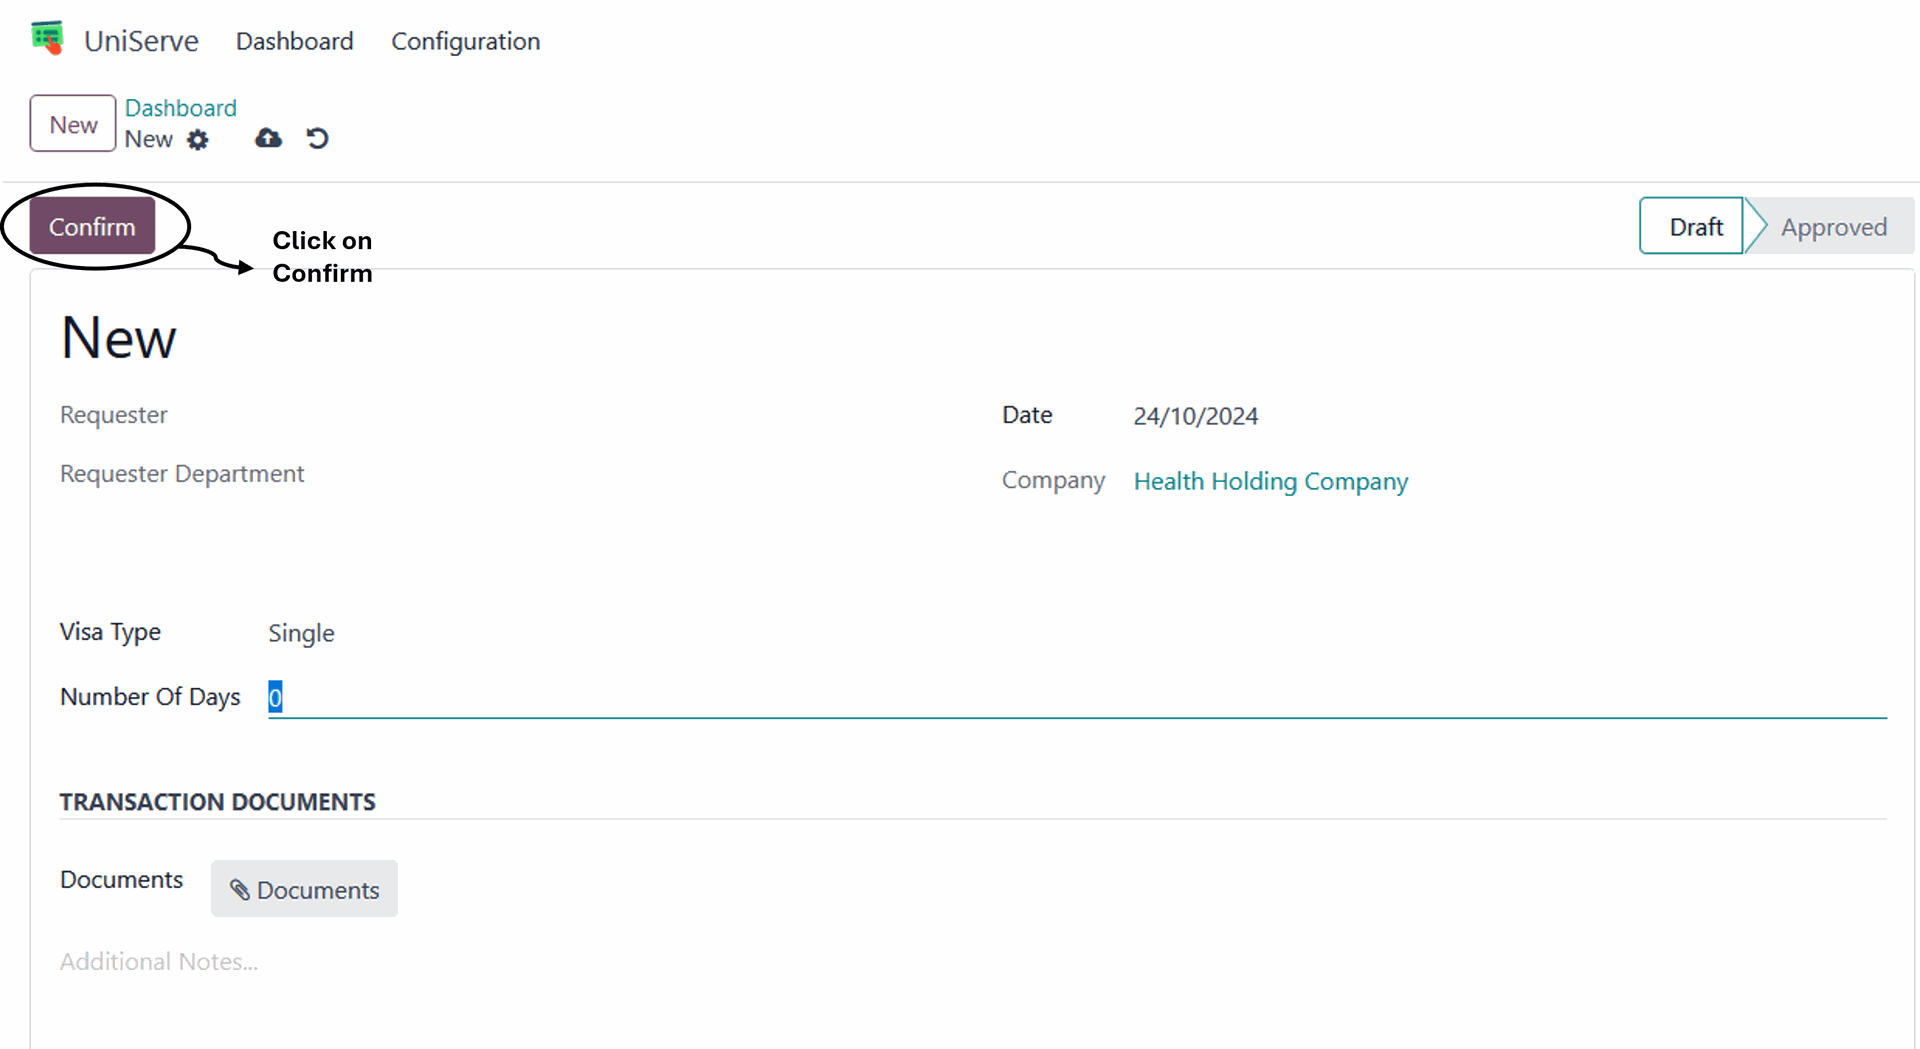
When accessing the request page, the requester and department's requester will appears automatically. The employee should fills in the required fields "Date, Visa type, Number of Days, transaction documents"and then clicks on Submit
The request will be submitted to the appropriate parties for approval or rejection, and after receiving final approval, the Visa will be issued
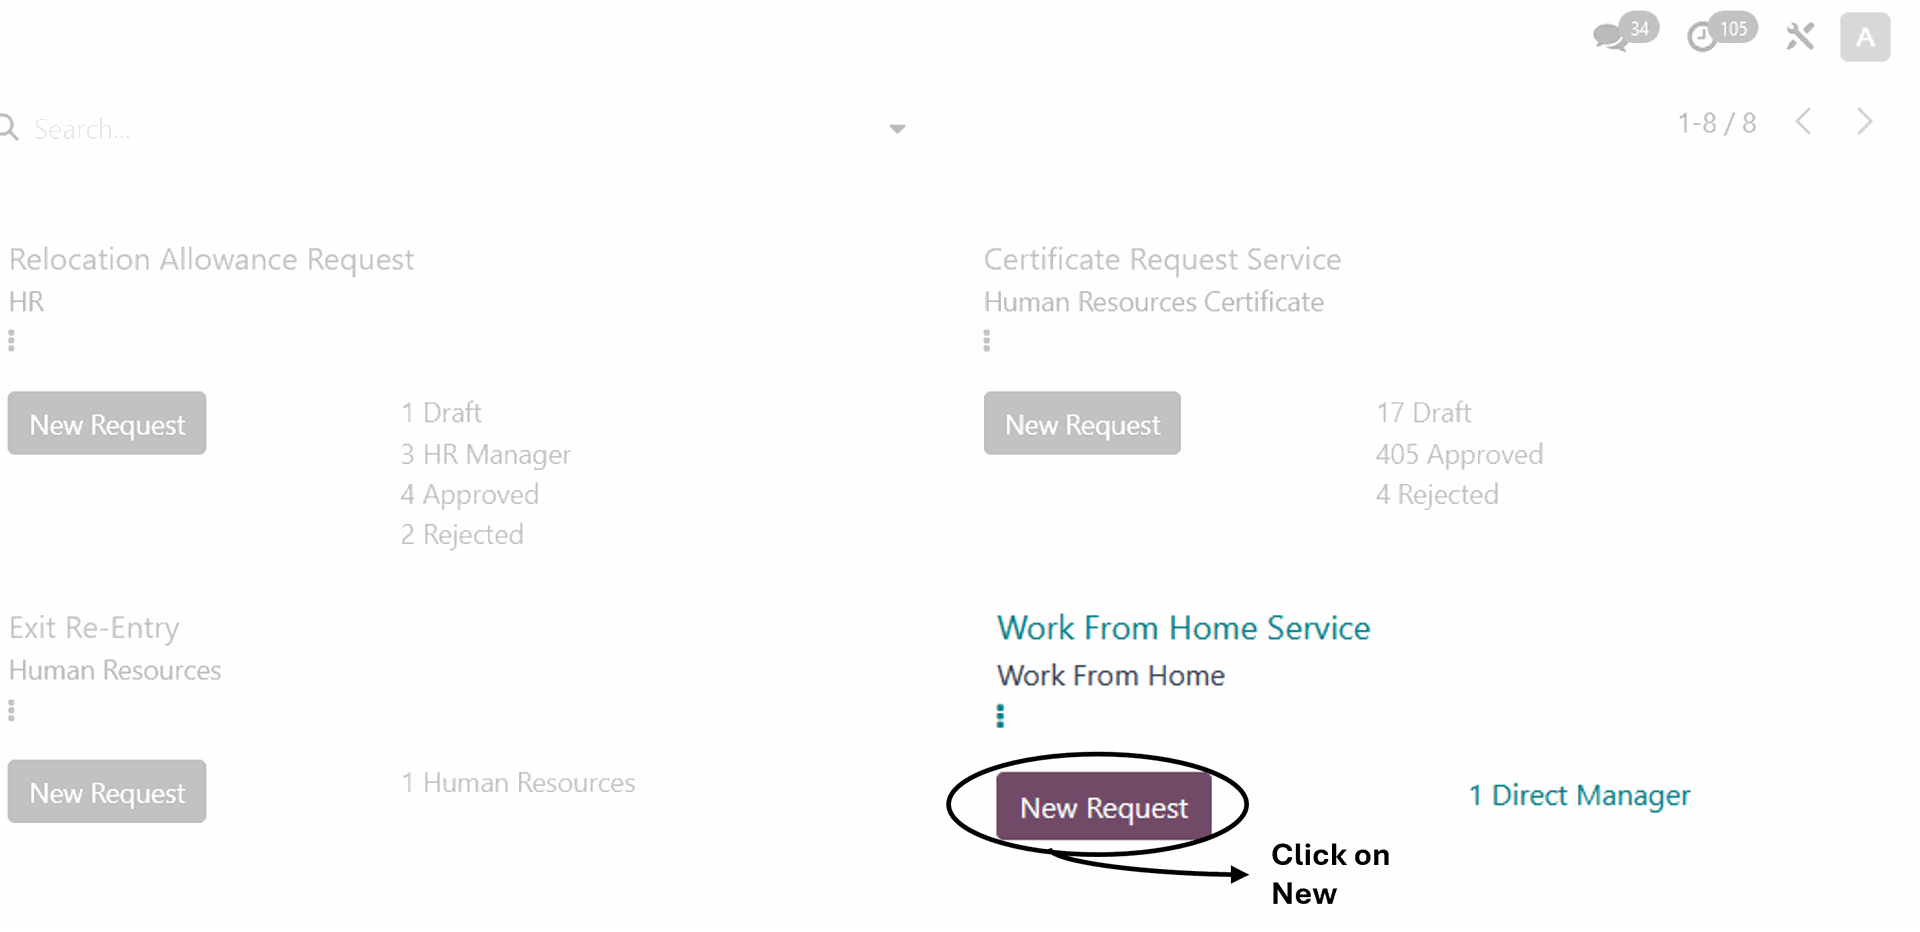
11. Work From Home
To access the Work From Home Page, click on the "UniServe" module icon from the main menu screen
Click on the "New Request" for Work From Home Service on the dashboard page. Only the managers can submit a request for the employees under their supervision.
When accessing the request page, The manager should select the Employee then fills in the required fields, including "From date and to date"and then clicks on Submit
The request will be submitted to the appropriate parties for approval or rejection, and after receiving final approval, the employee can work from home

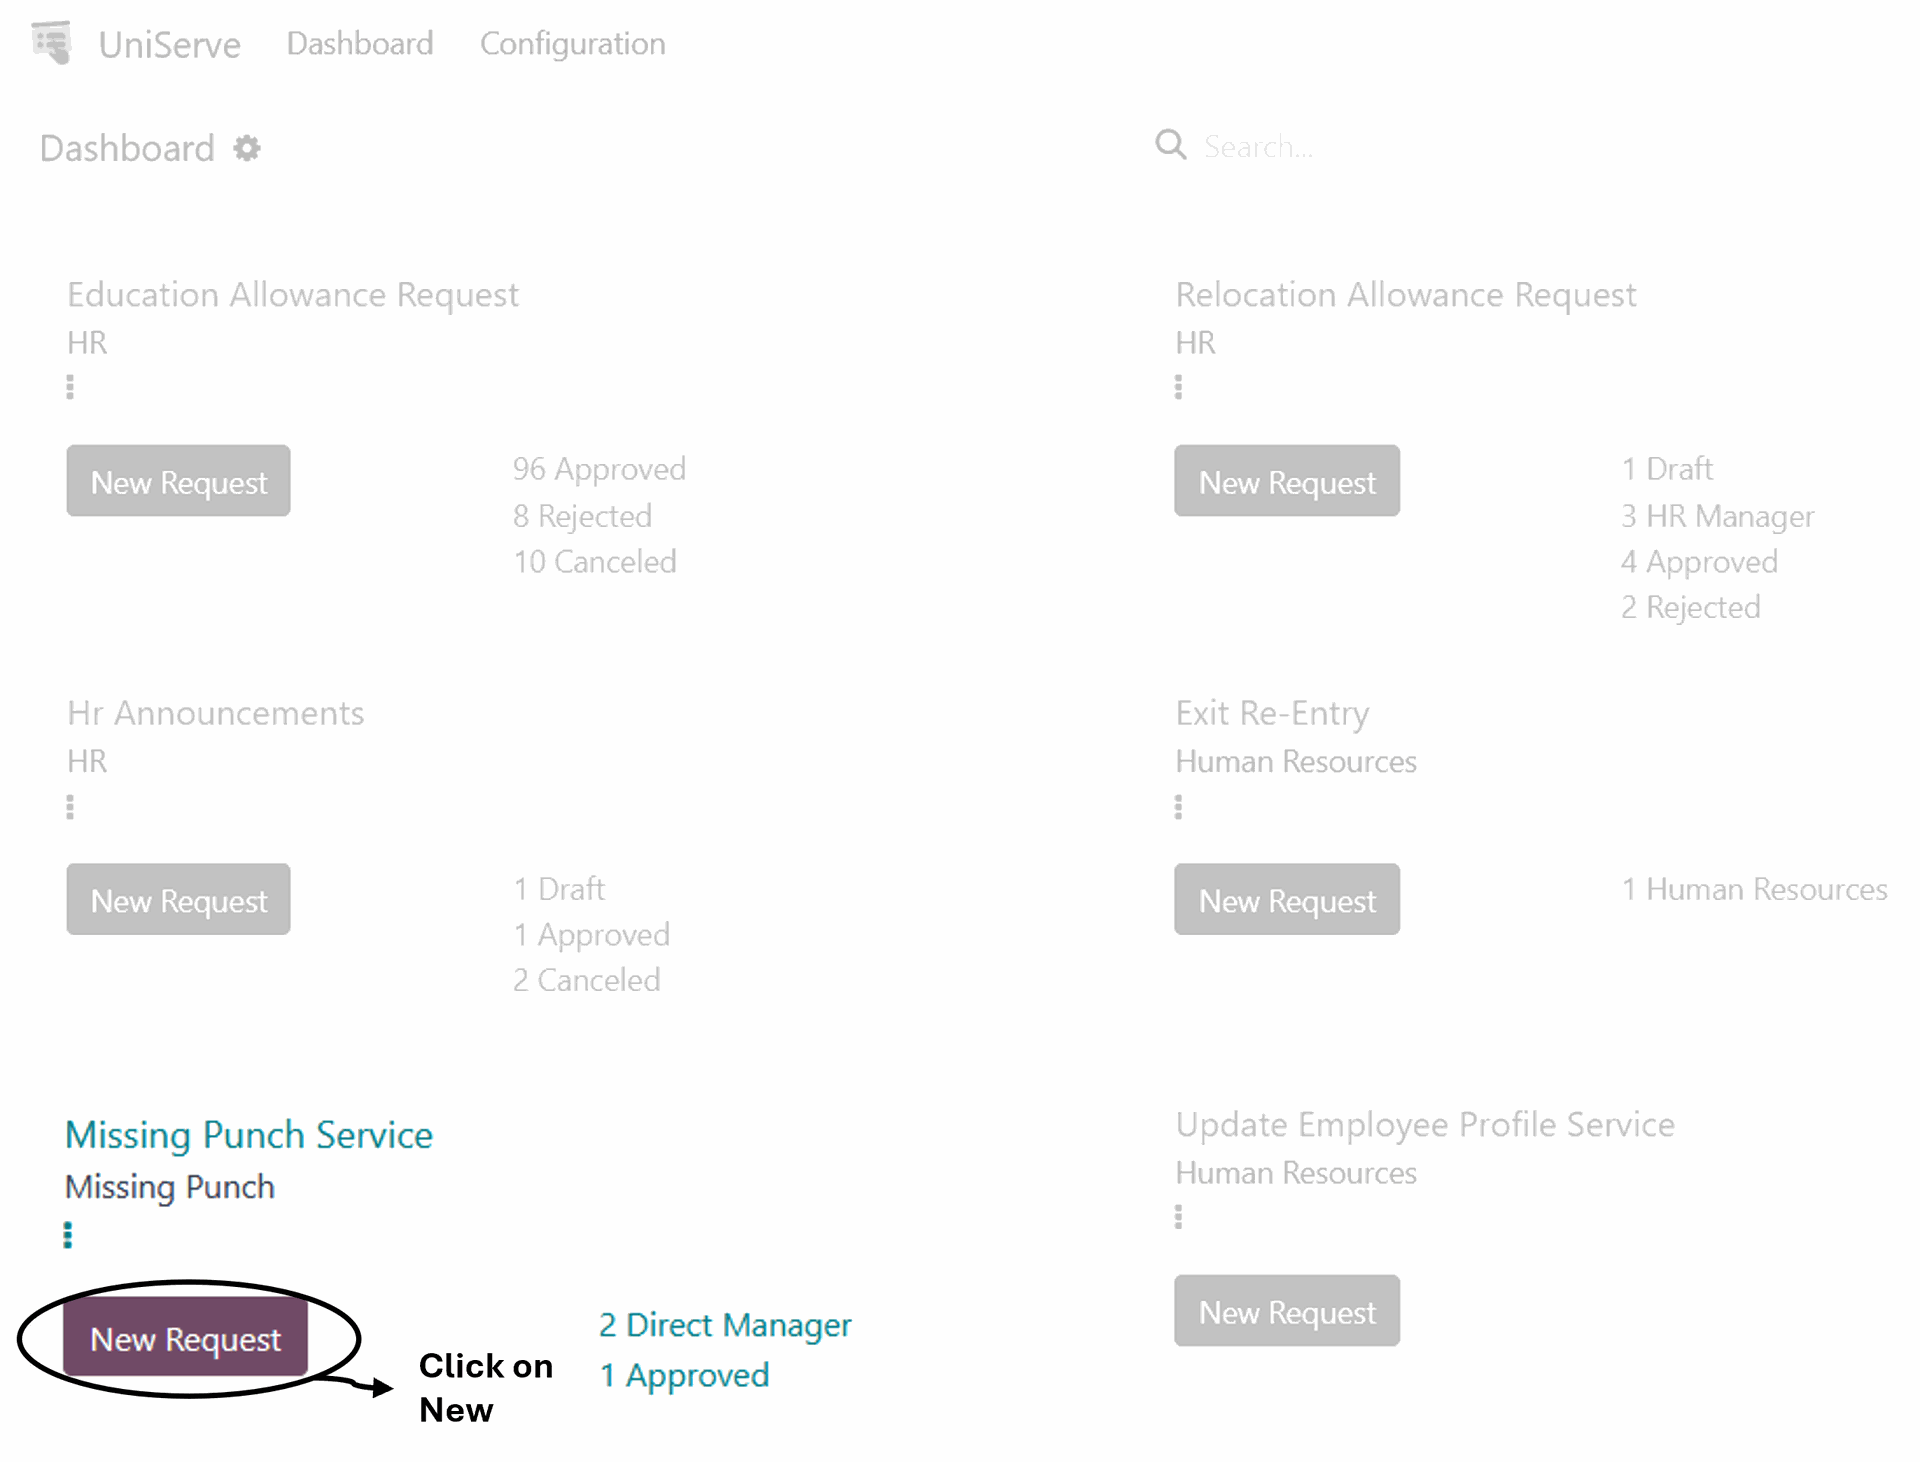
12. Missing Punch Service
To access the Missing Punch Service Page, click on the "UniServe" module icon from the main menu screen
Click on the "New Request" for Missing Punch Service on the dashboard page. Only the managers can submit a request for the employees under their supervision to modify the missing punch
When accessing the request page, The manager should fills in the required fields, including "Employee, Select the problem type, operation type, date, time of check-in and check-out "and then clicks on Submit.
The request will be submitted to the appropriate parties for approval or rejection, and after receiving final approval, the attendance for check-in or check-out will change according to the new times specified in the request

13. Update Employee Profile Service
To access the Update Employee Profile Service Page, click on the "UniServe" module icon from the main menu screen
Click on the "New Request" for Update Employee Profile Service on the dashboard page.
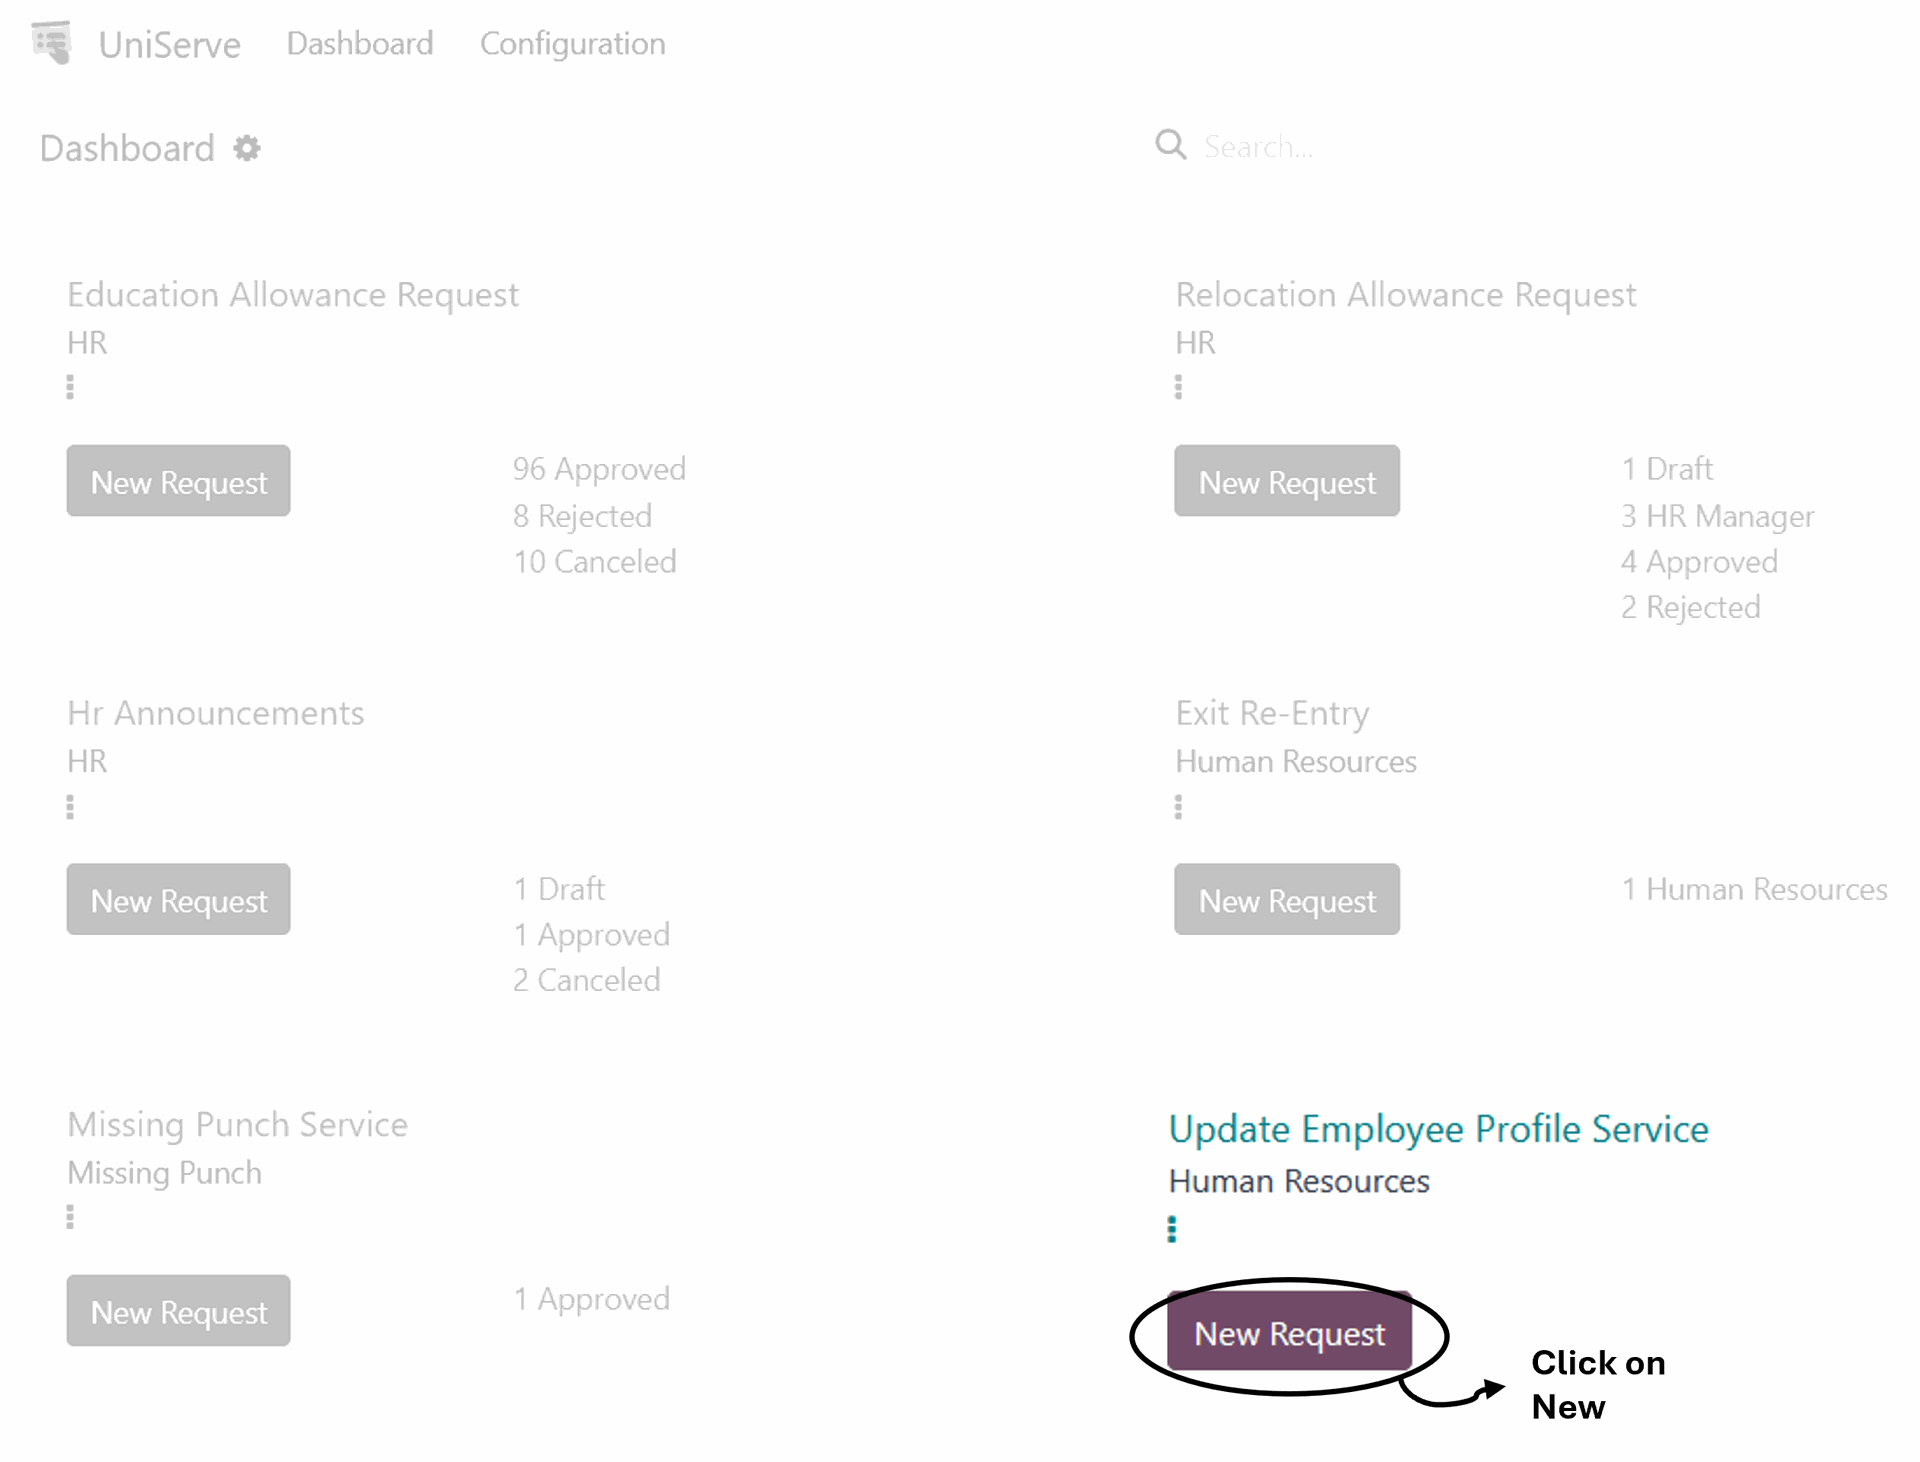
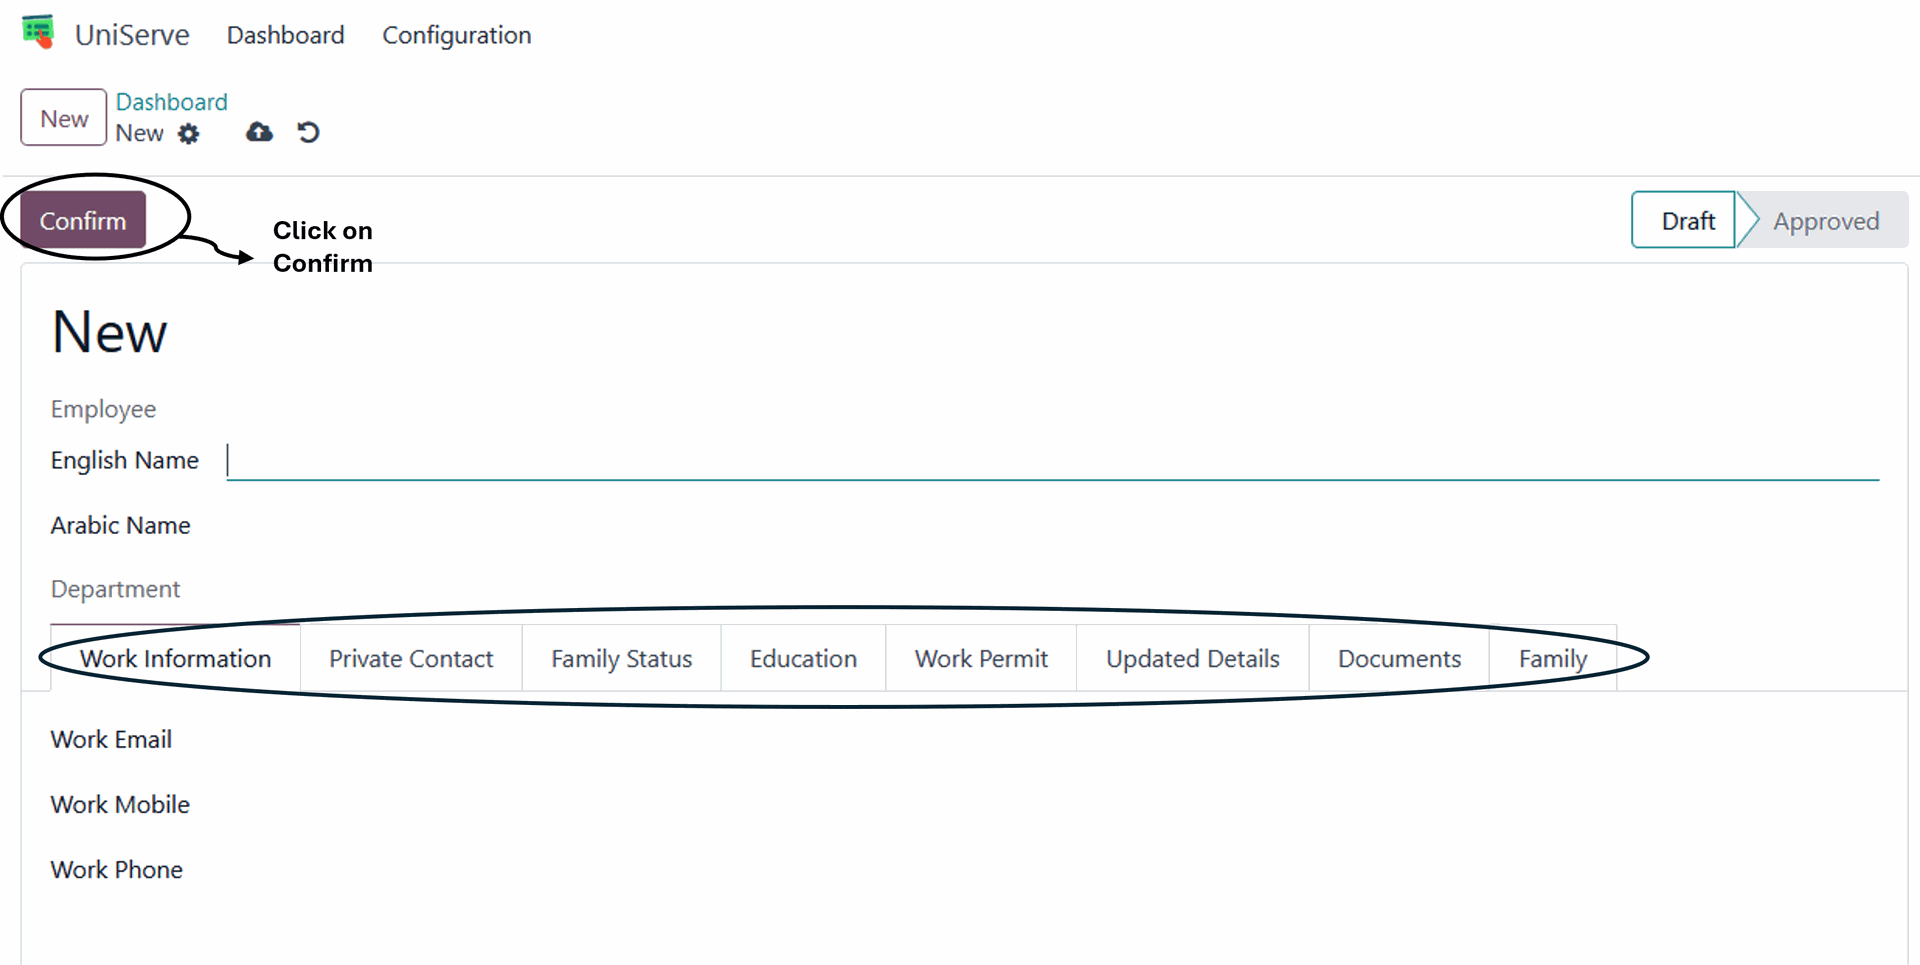
When accessing the request page, The employee updates the fields to be modified, including "Work Information, Private Contact, Family Status, Education, Work Permit, Update Details, Documents, Family Information, and Other Details," and then clicks on Confirm
The request will be submitted to the appropriate parties for approval or rejection, and after receiving final approval, the updated will be issued
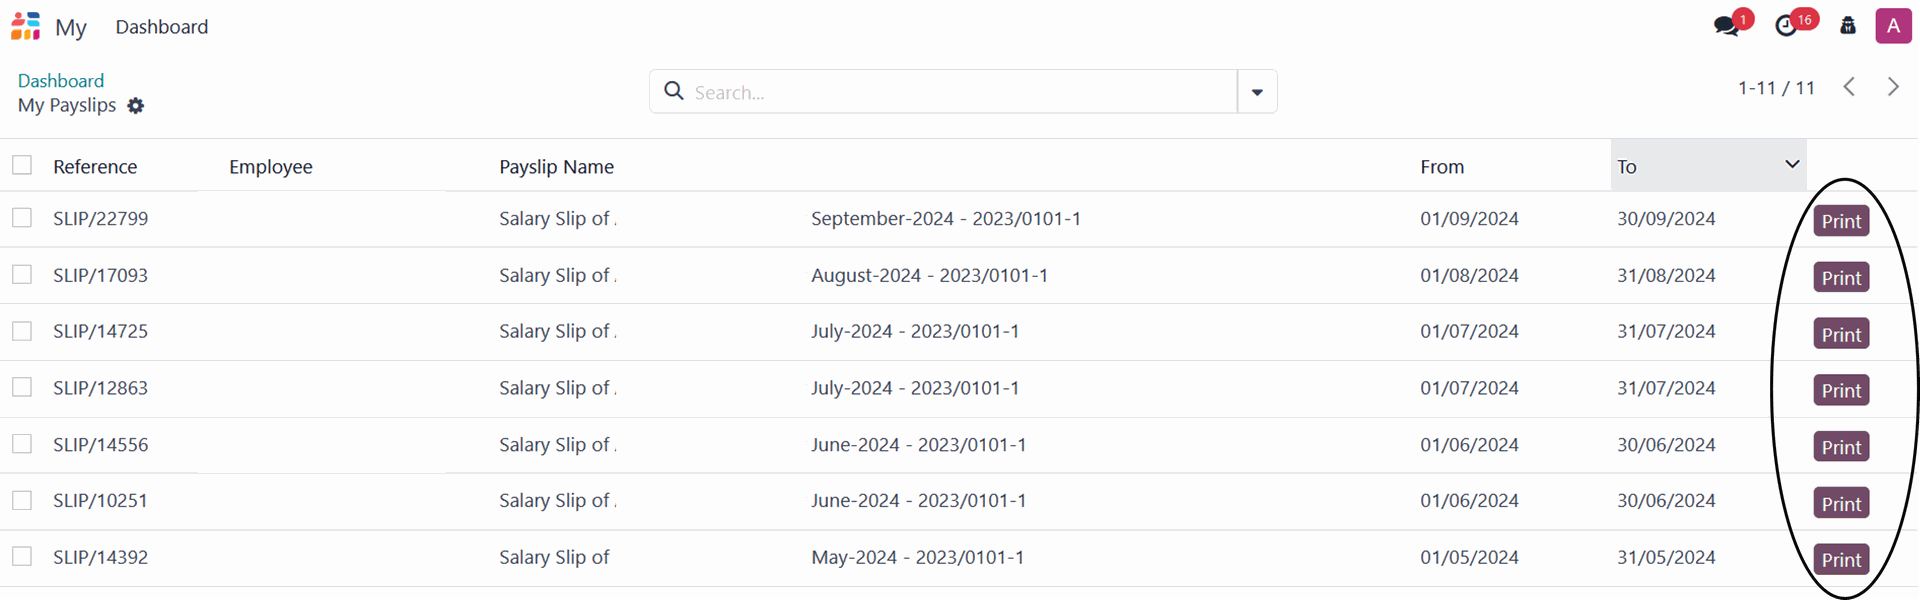
14. Payslips
To access the Payslips page, click on the "Payslips" module icon from the main menu screen
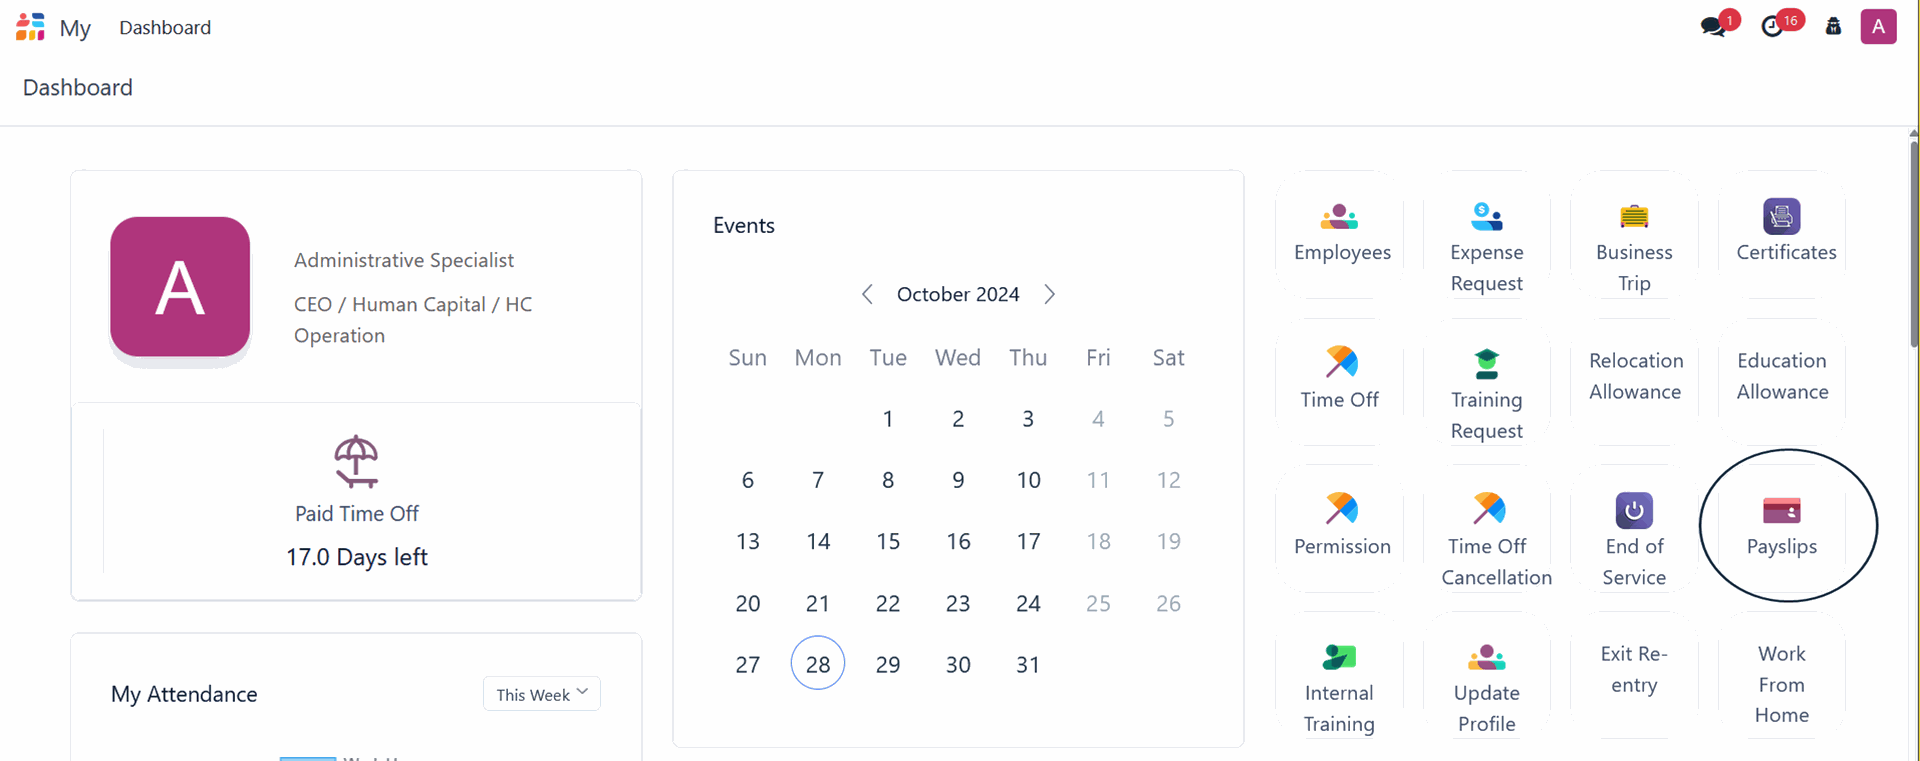
In this module, every employee can access and print their payslips for each month